Foodica Theme Review. Is It A Decent Food Blogging Theme For WordPress?
It’s review time on LayerWP. Join me as I take the Foodica WordPress theme by WPZOOM for a spin, with an in-depth review. My first ever review on LayerWP, despite me saying it’s a review site!
What is Foodica?

Pavel didn’t mess around and sent me a copy for review, which to me says a lot about the faith he has in his product.
A quick note before I review the Foodica theme:
Please note I have not been paid or received any compensation for the creation of this review.
Review conditions
This review will is conducted on a fresh installation of the latest version of WordPress. No other plugins will be installed, save for any the Foodica theme needs.
At no point have I contacted Pavel with my findings, this review is from my perspective without any influence from the creator. And is published without his approval. All good? Let’s get started.
Web Hosting on Kinsta
I host with Kinsta. Why? Because they’re rather good in fairness. This review of Foodica will be on their servers.
As I mentioned before it’s a clean slate, no plugins installed just the bare-bones theme nothing else. Hell, I’ve even deleted the Hello Dolly plugin. Yeh, a clean slate.
Installing the Foodica theme
Installing Foodica, is a simple affair. Once you’ve purchased from WPZOOM, you need to download the theme and grab your license key. What happens next? Well, see below.
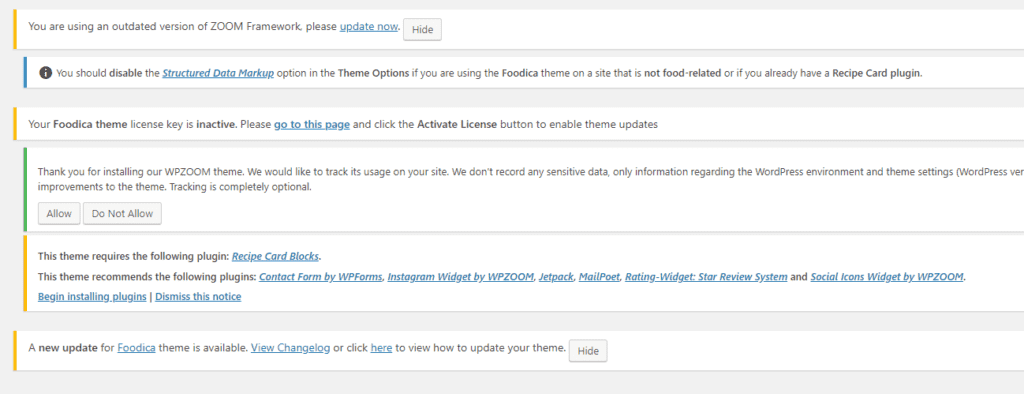
That’s a lot of notifications!
It sure is, I was given the theme to review last week and downloaded at that point. It’s good to see that WPZOOM is constantly working on the theme and pushing updates/features to it. Was just a little overwhelmed at first at the amount of notices that were shown. It’s quite a few.
Foodica plugins
There are quite a few plugins the Foodica theme utilizes. There are 7 of them in total, some require further set up, like hooking up to Instagram and more.

Jetpack
Find out more about Jetpack here

MailPoet
Find out more about MailPoet here

Rating Widget
Find out more about Rating Widget here
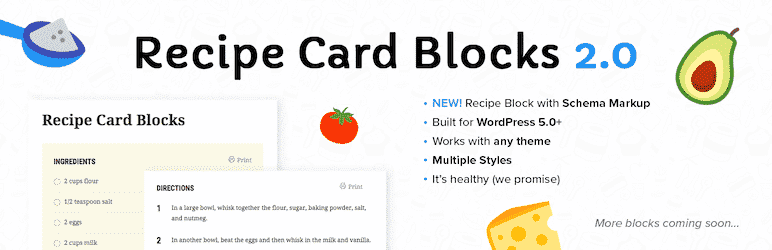
Recipe Card Blocks
Find out more about Recipe Card Blocks here
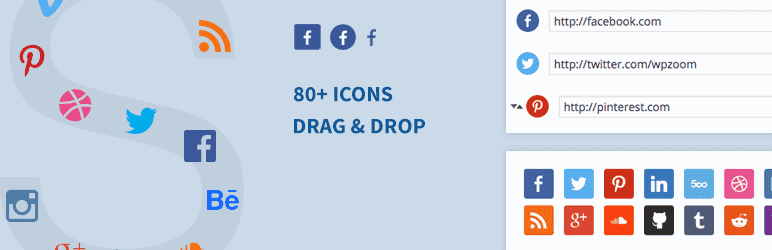
Social Icons By WPZOOM
Find out more about Social Icons By WPZOOM here
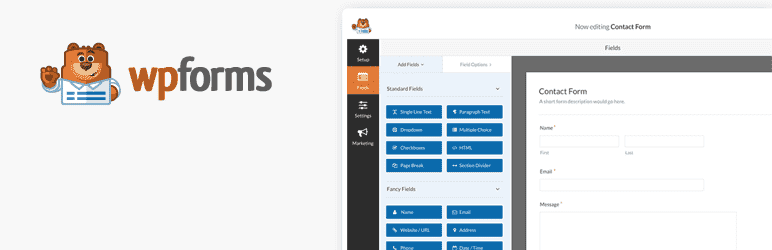
WPForms Lite
Find out more about WPForms Lite here
WPZOOM Social Feed Widget
Find out more WPZOOM Social Feed Widget
Foodica updated
I’ve gone through the motions and updated the theme, the framework, and installed all the required plugins recommended by the
WPZOOM Options
Foodica has several options available once installed. In your WP admin sidebar, you will see a new entry entitled WPZOOM. It’s here you can find several items.
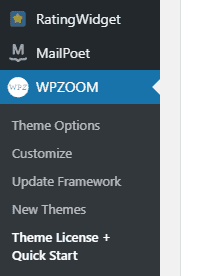
Theme Options:-
Here you can tinker around with various visual settings for
Customize:-
This option uses the native WordPress customizer and covers various options. Don’t worry I will cover this in more depth.
Update Framework:-
Self-explanatory right? Deals with updates to the theme framework.
New Themes:-
Highlights more themes from the WPZOOM stable.
Theme License + Quick Start:-
This section has handy links to theme Documentation (which might I add is very detailed). Also has information on importing demo content, how to add your logo to the theme, required plugin installation and lastly a link to support.
Importing demo content
There’s a handy import demo content section on Foodica’s Theme Options panel. To get a gist of how the theme is going to look filled with content, I’m going to set this wheel in motion.
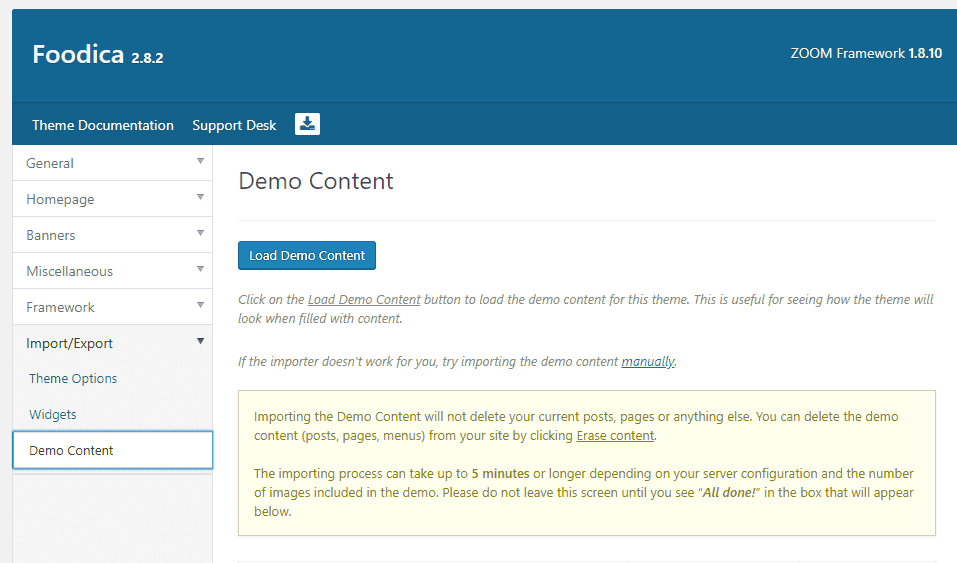
Currently, there is no content on the test site, I’ve deleted all the pages and posts, so it’s a blank slate. Hitting the Load Demo Content button, wish me luck!
Demo content stages
I was quite impressed with the demo import. There was plenty of notifications as to what was happening during the content installation. Take a look below for the various stages.
Stage one
The first stage of importing demo content took a few minutes if that. This stage deals with the import of the content and images.
Stage two
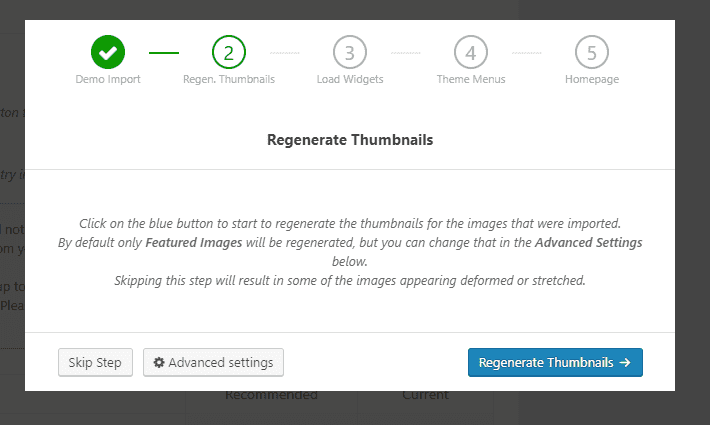
This stage deals with the regeneration of thumbnails making sure they are not shown squiffy/deformed .etc. There is a second stage (I will call it Stage Two A). You see the advance settings button next to skip step?
Well this deals with two more options. The option to delete “Hello World” post and the “Sample Page”. If you’ve edited either of these pages already, don’t worry they will not be deleted.
The next option is “Regenerate only featured images”, useful if you have a load of images already and just want to rebuild the post thumbnails.
Stage three
Stage four
Stage five
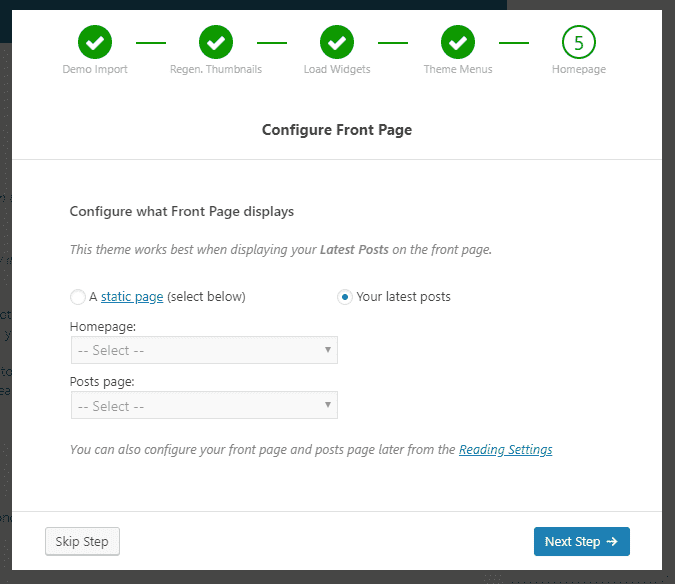
I like the way the demo import process holds your hand. Here you can choose what the Front page of your website will display. The recommendation is to show Latest Posts, so I’m going to leave it as it is.
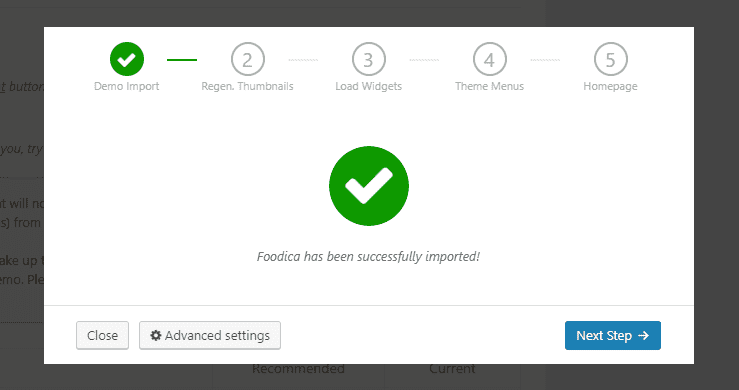
Demo content complete
The Demo import process was pretty darn smooth in fairness. With a few options thrown in for you to view while it’s doing its thing. I made a couple of mistakes; I didn’t set up the WPZOOM Social Feed Plugin correctly; that’s why there’s a note that the widget is misconfigured.
Also, I didn’t install WooCommerce, but the demo import added a shop page to the theme install. My fault completely. Hey, nobodies perfect!
Foodica theme options
There is where a large part of the meat of Foodica is housed. You can tinker with various bits and pieces to get the look and feel right for your new food blog. Let’s take a look at what’s on offer.
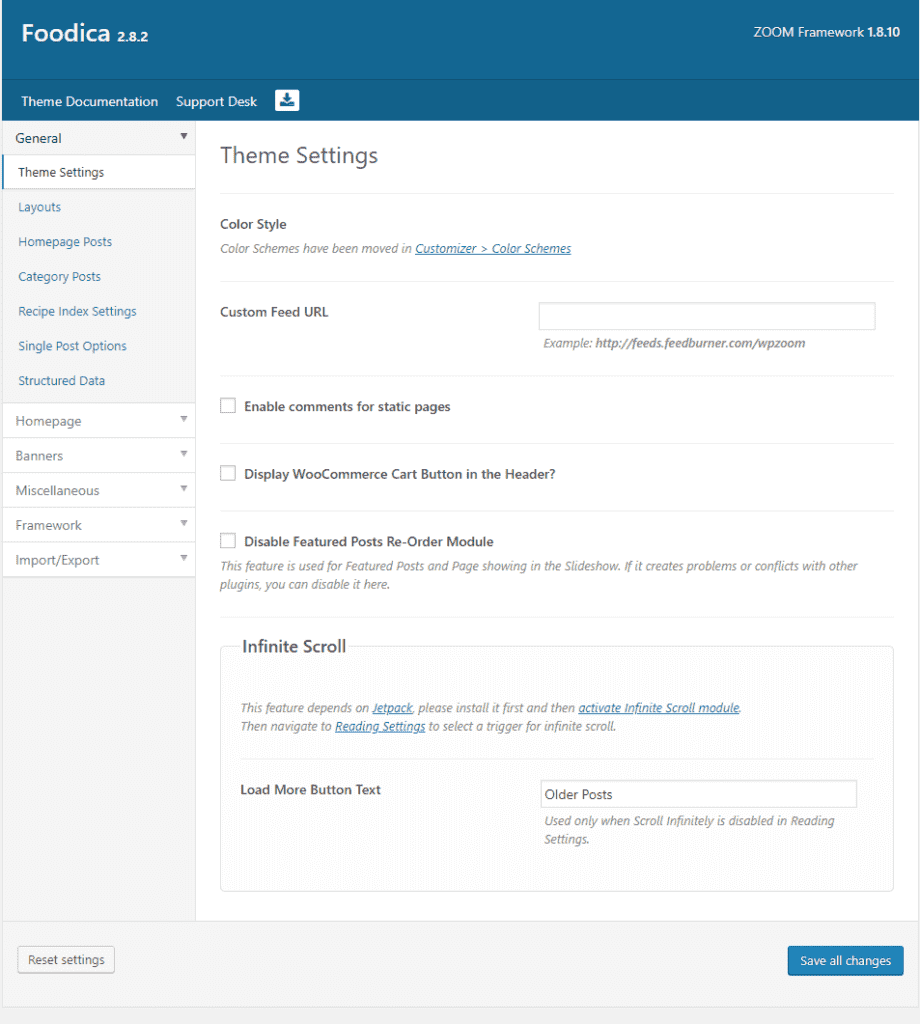
Color style
This option is actually dealt with by the native customizer and provides a link to open it up and play around with it. (Will cover this later)
Custom feed URL
If you have a specific system to handle your RSS feeds this is where you can the URL.
Enable comments for static pages
A simple tick box to enable comments on static pages. You can turn this off on a page by page basis. (Just checked it out)
WooCommerce cart button
Another simple checkbox as to whether you want to show the cart button in the header of Foodica.
Featured posts re-order module
Checkbox again, simply check if you’d like to disable the posts re-order module in case it has conflicts with plugins you currently use on your site.
Lastly infinite scroll
This option requires the use of JetPack. You will need to activate the infinite scroll module provided by the JetPack plugin. Here you can change the text of the load more button, make it sound sexy .etc.
Homepage layout settings
This section in the theme options deals with your homepage layout. Here you can choose a few different things.
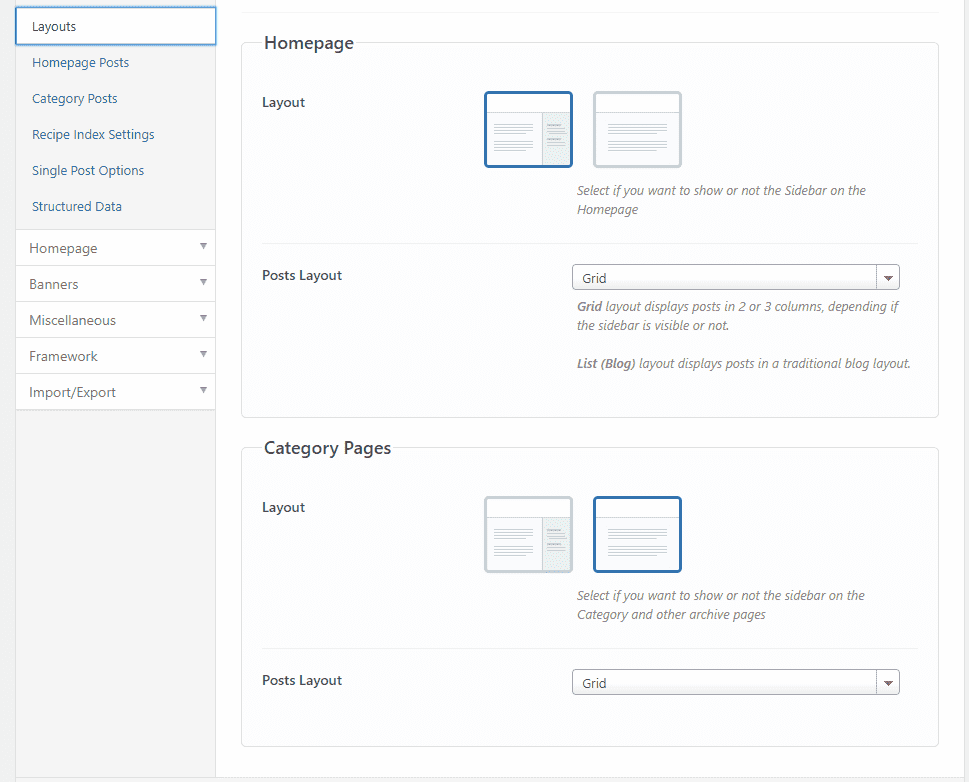
Choose from a sidebar layout on your homepage or a full-width display. You can also select the layout of your posts, choose from either grid or list.
Homepage post settings
When it comes to showing the homepage in a WordPress theme, you can be limited in terms of what you can do. Not so with Foodica. There’s a wealth of options to show or hide elements from the homepage.
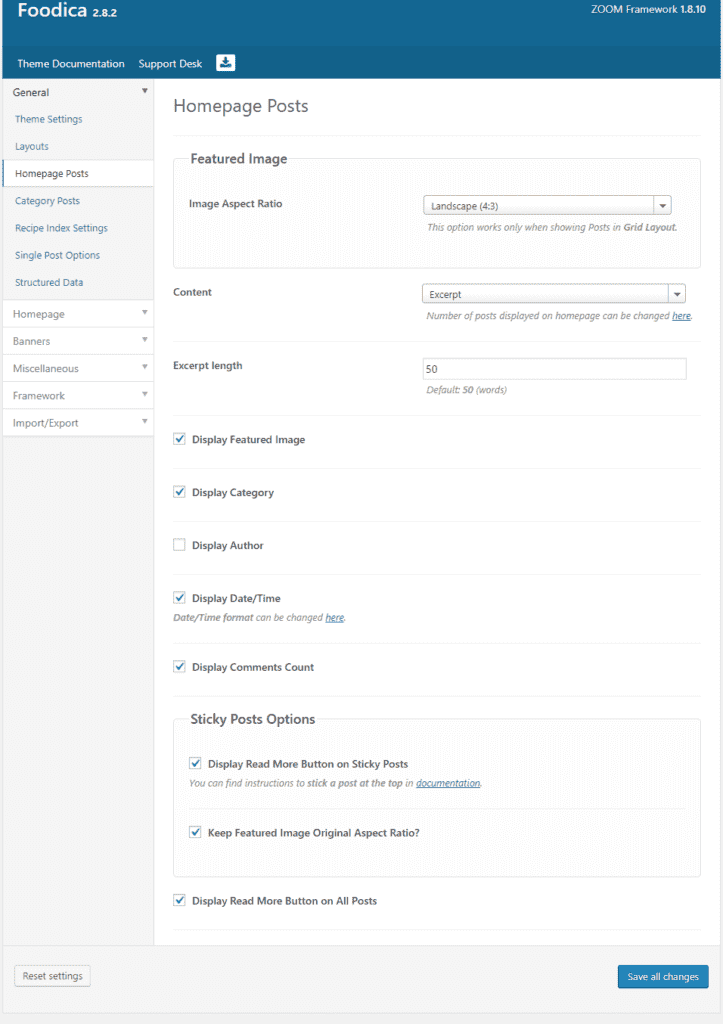
Featured image
Content settings
Here you can choose excerpt and set the excerpt length in the input box below. Want to show the whole post, you can. Don’t want to display any post content, then choose none.
Post meta options
Some more choices here, and I like them. Here you can choose to enable or disable post meta. Options for showing the featured image, showing the category the post belongs to.
Choose to display the author or not. Handy if it’s a multi-author blog. Show the date and time, comments count, and lastly sticky post options.
Here you can choose to show the read more button on sticky posts and whether or not to keep the featured image in its original aspect ration. Finally, choose to enable the read more button on all posts.
Settings for category pages
There is no point me showing you the category settings page. Not me being lazy you understand. It’s just that all the same options are available, which is awesome.
Giving you complete granular control on how your category pages will be displayed. It’s a great feature and helps keep the flow of your site as it should be.
Recipe Index Settings
If you’re a food blogger and want to display your recipes, Foodica has you covered. Here you can change a few things add a recipe index and more.
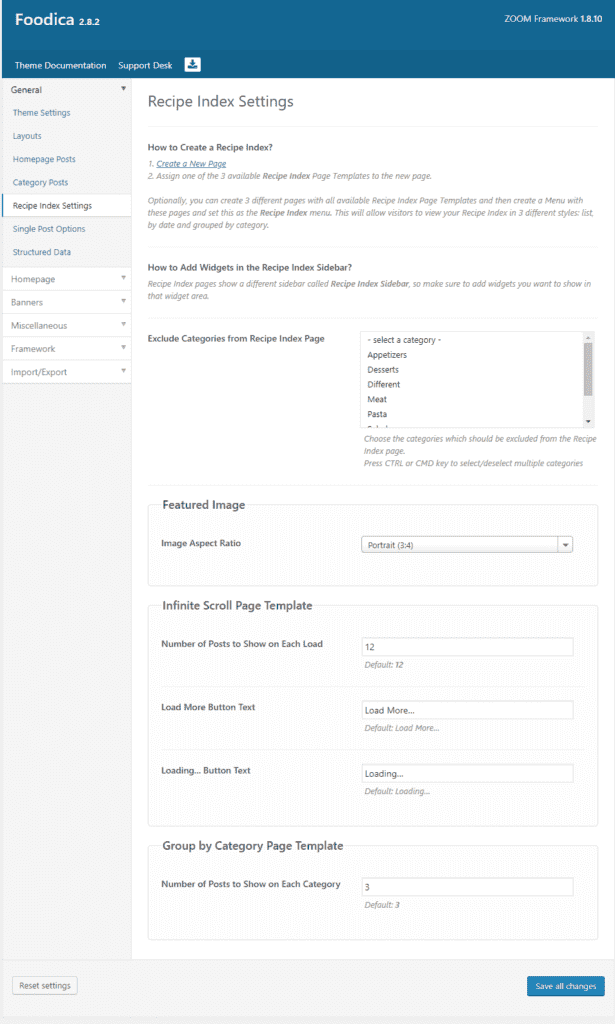
The Recipe index
Here you can create a new page and assign it one of three different page templates, and they are as follows:
- Recipe Index Group by Category
- Recipe Index List
- Recipe Index Infinite Scroll
I will cover what the above looks like. Before I do, there are more options available that will affect their display.
Recipe Index Widgets
Category Exclusion
Another nice feature in Foodica, is the ability to exclude specific categories from displaying on your Recipe Index pages.
It’s not a recipe, is it? Just remove it, and it will not be on show. Nice and simple.
Featured Image
As per previous settings here it’s portrait or landscape for your index pages.
Infinite Scroll Page Template
Here you choose the number of pages to show on each load, enter in the required amount. Choose your load more text on the button and lastly the text for loading. To get this working, you must have Jetpack installed.
Single Post Settings
Foodica has a stack of options that deal with the display of your content. So far we have covered index pages for recipe categories, homepage settings and of course categories.
All brilliant next up is single post settings. You want a level of fluidity to your shiny new food blog, don’t you? Well, this is where you can do just that.
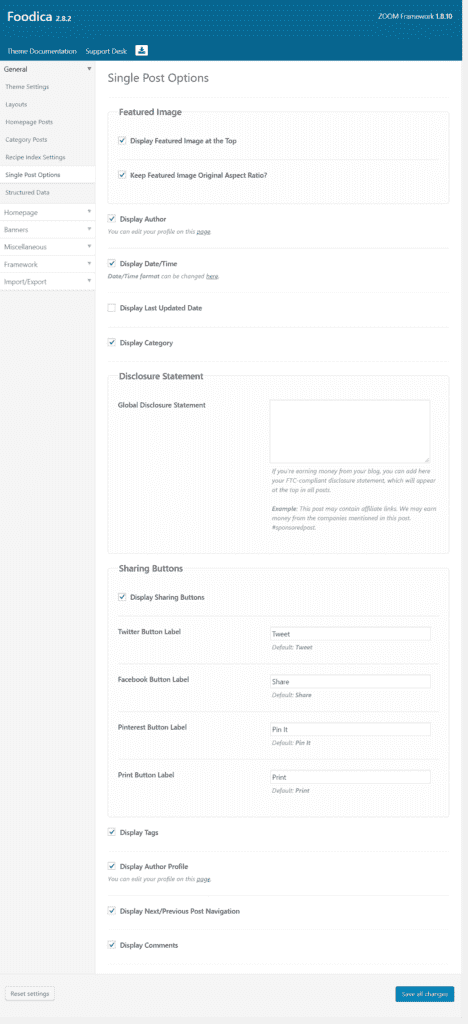
Featured Images
Here you can choose if you would like the featured image to be displayed and whether to keep the pictures original aspect ratio. If you’re a food blogger, images can make or break a site. So it’s good to know Foodica has this at the forefront.
Meta Data Display
Choose whether to show the blog author (again useful if you run a multi-author blog) or hide it. The same can be achieved for the date/time, choose to display or not.
Another neat little feature is showing the last updated date. Again useful if your recipe/post has had alterations of late. Letting your readers know if an article was updated is pretty sweet.
Don’t want to show the category your post belongs in? You can hide it here.
Disclosure Statement
Like this a lot. It can be a pain in the rear, adding a disclosure statement to a blog post that contains affiliate links.
Anyone who adds affiliate links will testify to that. This section sees you adding a generic disclosure statement to your posts to ensure your site remains compliant with various laws in different countries.
A sweeping disclosure statement covering the links used, why you use them, and how they benefit you as a blogger, and how they don’t affect your reader’s rights. Very useful, indeed. It doesn’t end there, though.
More settings
Foodica has a few more tricks up its sleeve. There are a few more settings, don’t worry, I will cover them. As you probably guessed, I’m going to cover them, what’s the point in a review if you don’t go to town. I, for one, am having a blast. I hope you are as well.
Display Social Sharing Buttons
Display Tags
If you’re into tagging posts/recipes, here you can choose to enable or disable depending on your preference. Tags are displayed centrally with a beautiful underlined/highlight format. Shown just after your post content.
Display Author Profile
If you’ve chosen to display the author profile on a post, here, you can choose to show it. It’s different from the post meta, which just provides a link.
This setting will display the profile you have set up in the backend of WP. It’s in the WordPress sidebar, under Users > Your Profile. Any input here will be displayed on the post. Again I will cover this, so don’t fret.
Display Post Navigation
Want to show people what the next post will be in your blog?
Display Comments
If you’re into tagging posts/recipes, here you can choose to enable or disable depending on your preference.
Comments can be flicked on or off here. A useful feature, I say useful. You want people to interact with your content, but maybe you do not want to?
Probably best to leave it on if you’re first starting out, then maybe switch it off if your food blog gets popular!
Structured Data Setting
Any SEO whizz will tell you or extoll the virtue of Structured Data. It can be the difference between your post being viewed or not.
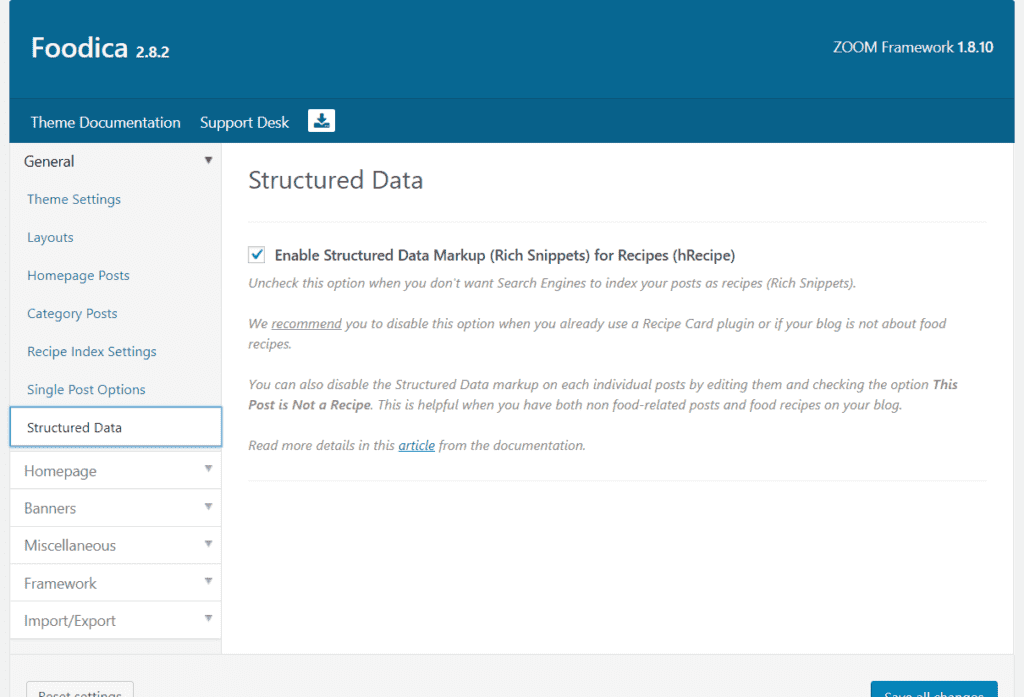
As
Foodica, although billed as a food blogging theme, doesn’t mean it has to be. Simply disable this, and don’t use a recipe plugin, meaning Foodica is flexible enough to be used as a blog for a wealth of different uses.
There’s A Lot To Foodica
No denying it, there are a lot of settings for Foodica. I mean I’ve only just covered the general settings, and there’s still more to cover. Some may be a little overwhelmed at first, especially those looking for a simple blogging theme for a food blog or just a blog in general.
Don’t be put off. Although a lot of options can be a mind F%^ at first, it doesn’t mean it’s a bad thing. Better to have options that you can enable or disable from the get-go.
Either that or you outgrow your theme and end up looking for one that can do everything. Which so far, Foodica does.
But hey let’s not blow wind up Foodica’s ass just yet. We still have a way to go.
Home Page Specific Settings
I’ve talked a lot about the homepage in
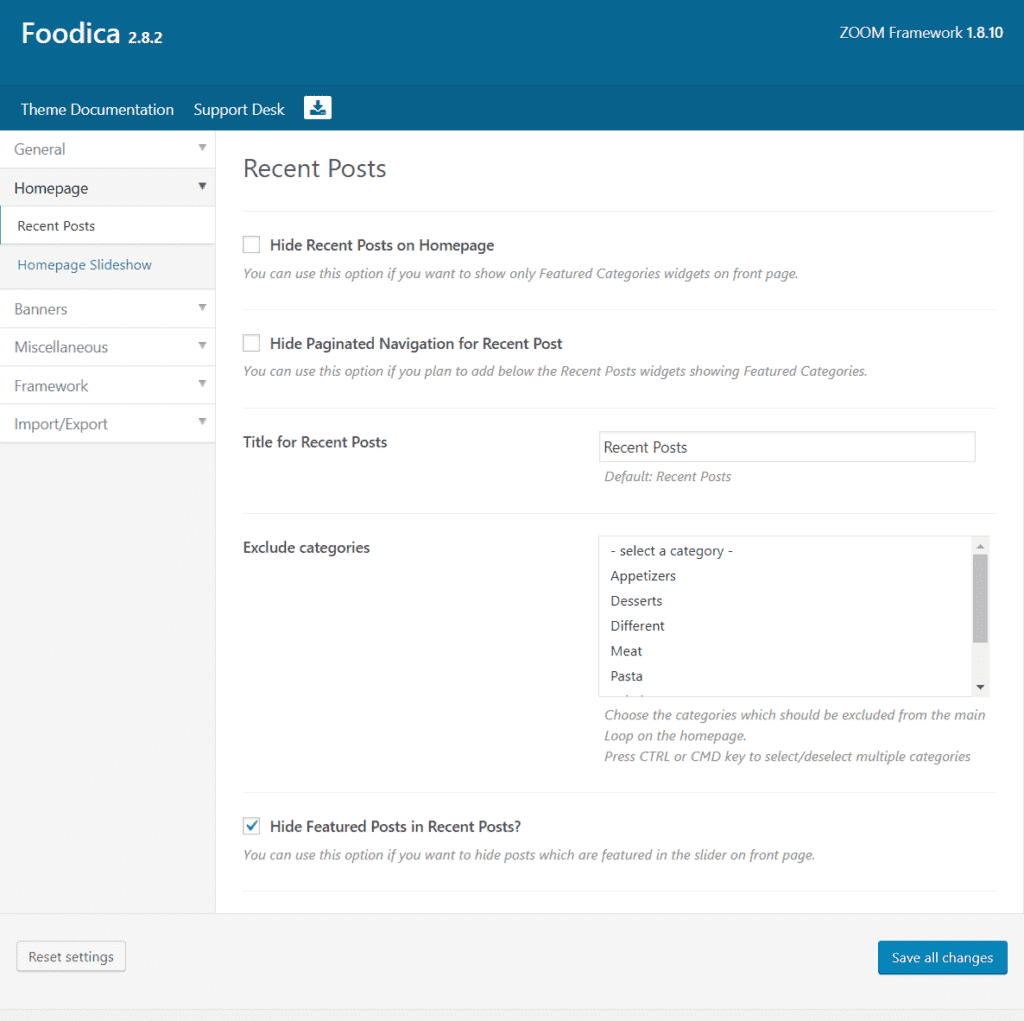
Recent Posts
We can drill down further thanks to this setting. So let’s cover recent posts. The first option is to hide recent posts, if you choose this, then the homepage will rely on feature category widgets.
More on that later, yes I will cover all the available widgets within Foodica. I like to be thorough. I guess you might know that by now!
Homepage Slideshow
Another cool feature of Foodica is the inclusion of a homepage slider. You don’t have to use it might I add. But sliders can be a great way to showcase your content for those landing on the homepage.
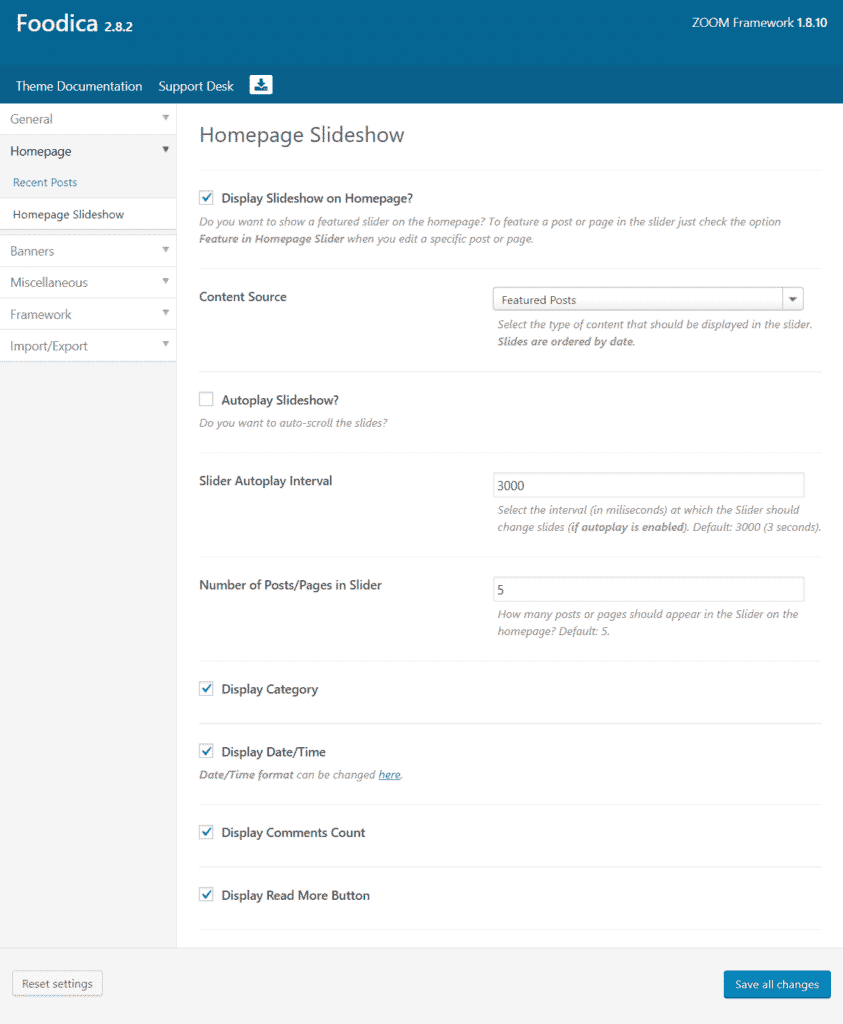
Here you can choose to show or hide the homepage slider, and selecting the content source for your slider. Should you wish to enable it. The content source choices are Featured Posts or Featured Pages. There’s also an option to Autoplay the slideshow; under this, you have an interval input.
Here you can choose the time in milliseconds between the slides,
You can also choose the number of posts or pages you’d like in the slider; the default is 5, you can change this to whatever you need.
The last four options deal with, whether you’d like to display post meta in the slide. Choices are: display category, date/time, comment count, and read more button. Toggle what you want to display and what you don’t.
Banner Settings/Advertising Settings
Foodica has some pretty useful advertising slots, and this is where you can enable or disable them.
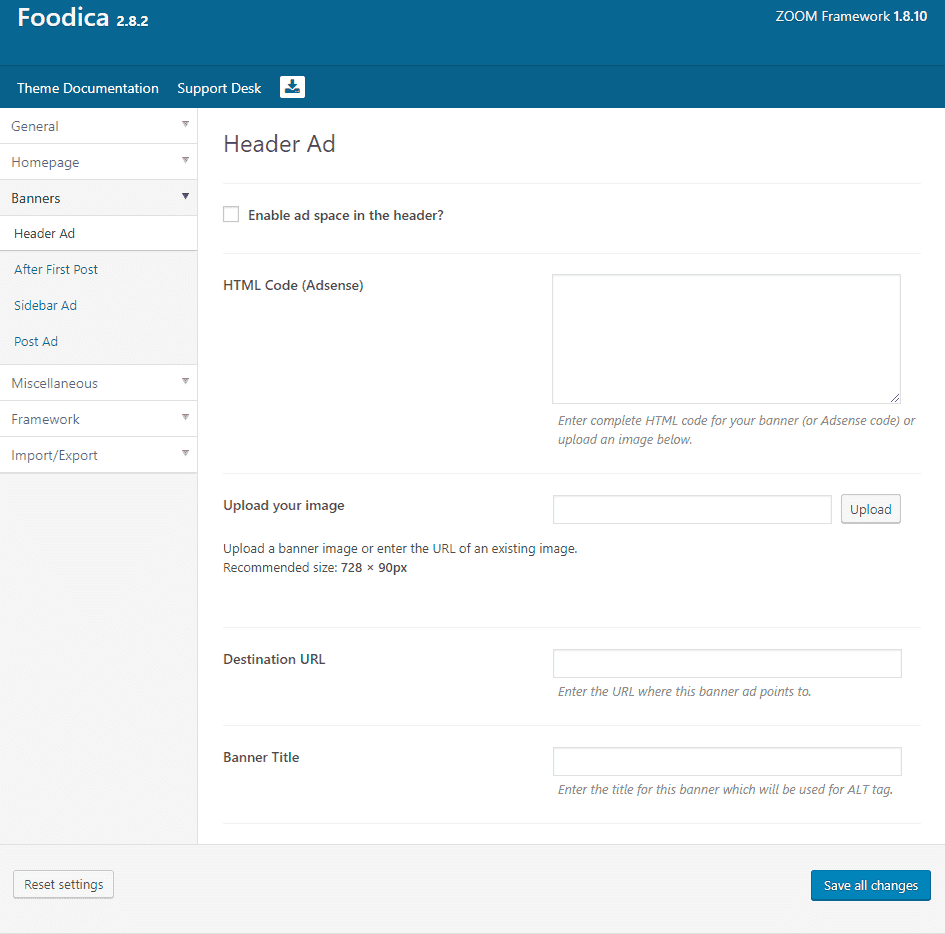
Header Ad Slot
We have a header ad, and a checkbox will allow you to enable this feature. You can either enter HTML code (think Google Adsense or other platforms) with a cut and paste.
Or you can upload an image measuring 728px by 90px, then in the next box add a destination URL of your choosing. Lastly add a banner title or ALT text for the image, so screen readers/search engines know what it’s called.
After The First Post Ad Space
The same options reside here as the header ad slot. This option will show an advert on your homepage, just after the first post.
Sidebar Ad Space
Post Ad Space
Same options again, however, this advertising space will be shown in every post after your content.
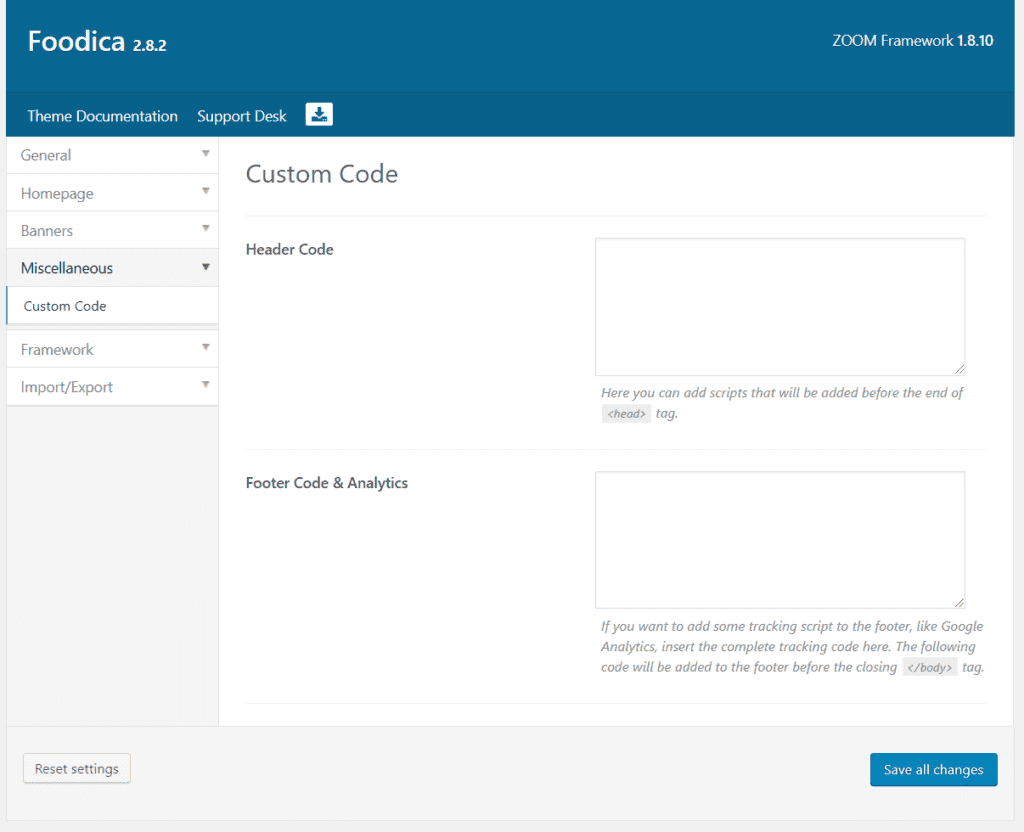
Miscellaneous Settings
If you need somewhere to add your analytics code or custom code, Foodica has a handy option for this.
Framework Settings
You will probably never need to tinker with these, but they are on offer should you feel the need. They deal with various settings such as displaying meta tag info about the framework.
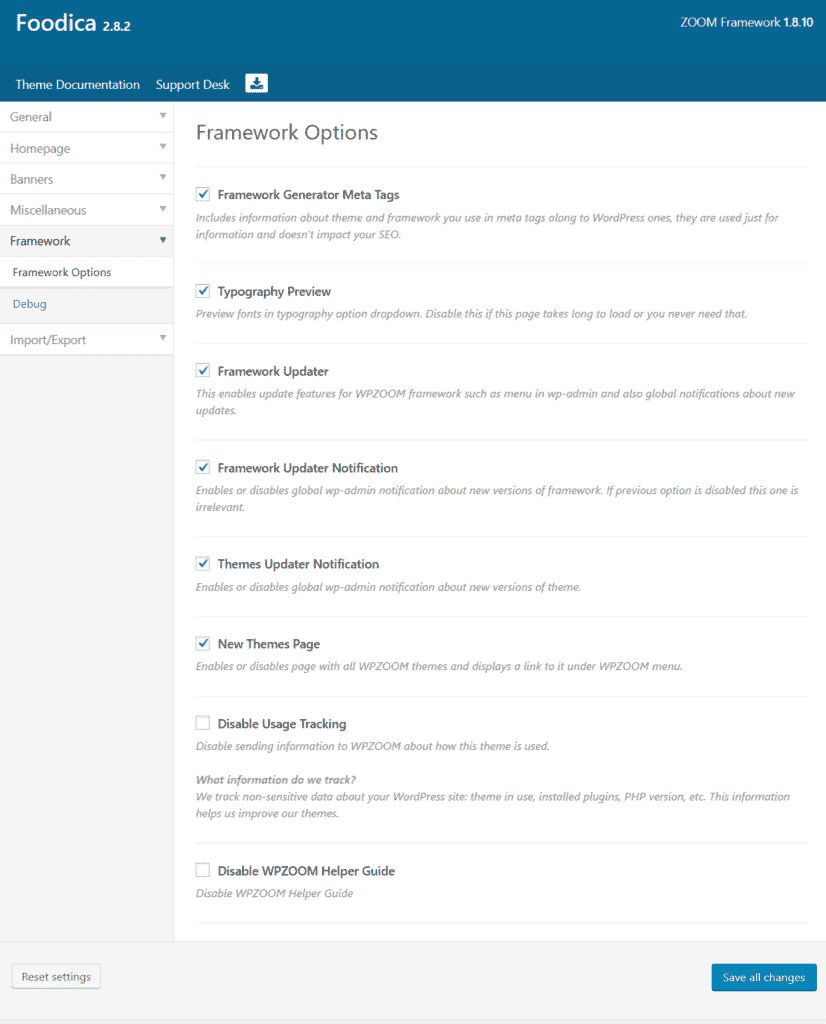
The updater notification will display if the framework needs updating, I’d recommend you leave this on. As no doubt, an important may arise, and you’ll never know about it! So leave this option.
The same can be said for the theme updater notification, so leave this option in place.
Usage tracking, I’ve never been a fan of allowing this. For plugins or themes, thankfully you can disable or enable here.
The
Before I forget there is also a debug option in the Framework options. Here a box filled with your settings, server config, PHP version, and plugin info. This is for you to cut and paste your settings and send them to WPZOOM if you have any issues with the theme.
It will help support get to the root cause of any problems you may have.
Import/Export Settings
The last entry in the settings tab for Foodica deals with the importation and exportation of theme settings, widgets, and more.
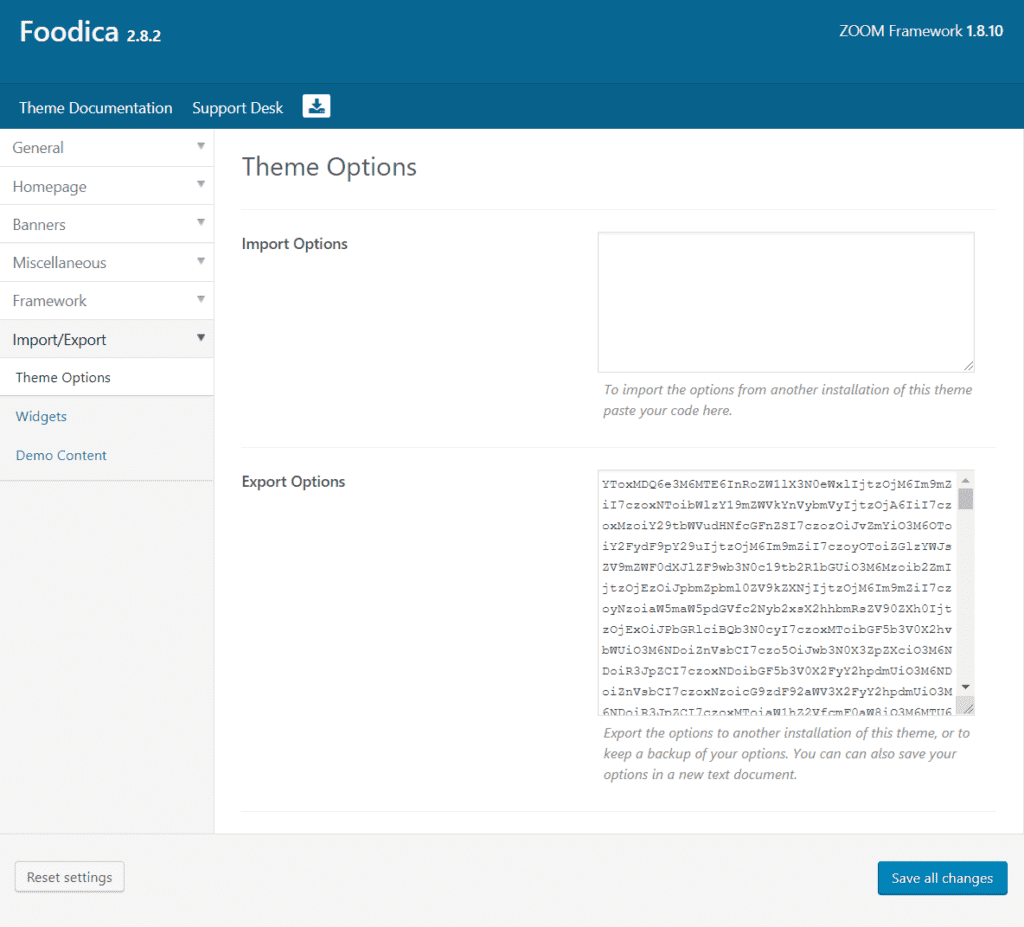
If you have another install of Foodica and would like to import these settings, this is where you can cut and paste code from the other install.
An input below the import box will show code to export your options. Cut from here and paste into another install.
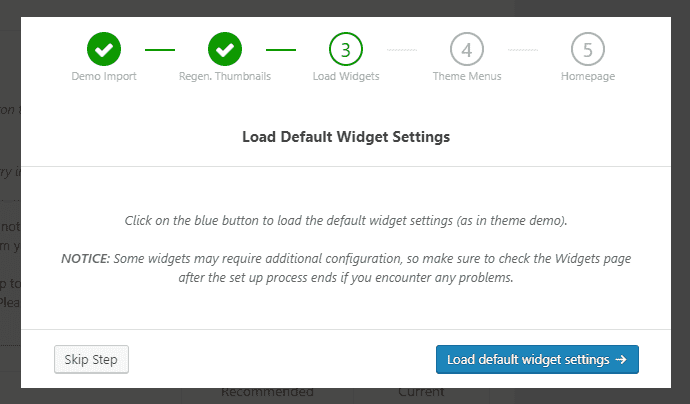
Widgets, here you can perform the same as the above with the additional option of loading the default widget configuration. Handy if you’ve messed up at any point.
Demo content, here you can load the demo content (if you haven’t already) as well as displaying a demo import history.
In the demo import history, there’s an option to delete all demo content. Again useful if you made a mistake, under this is a list of your server config.
There’s also a link with details on how to install demo content manually, useful if you have options with the frameworks import.
Quick Start Guide
Foodica has a ton of options. I think I’ve probably already mentioned that before. I think they are well thought out and not overkill. However, some may get a little lost.
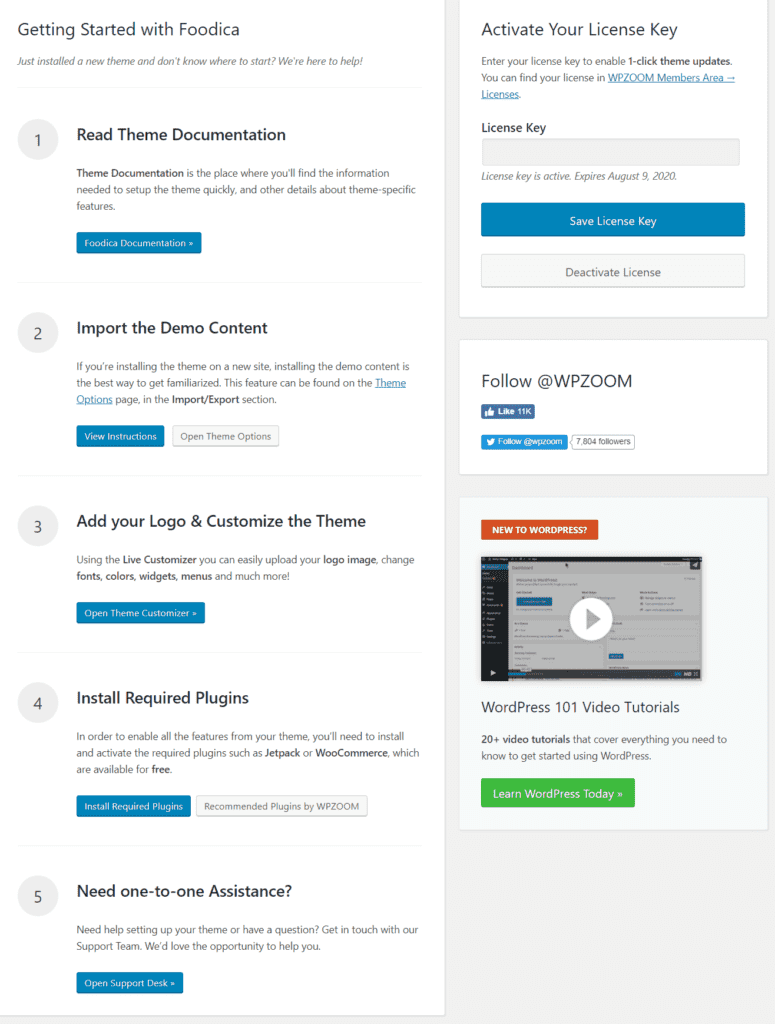
So it’s good to know Foodica counters this with its quick start guide, conveniently located in your admin sidebar.
It’s here you can find information such as theme documentation and more. This is where Foodica shines, the documentation is pretty killer, with YouTube videos, useful how-tos, and much more besides.
There are also options for importing demo content, a link to the customizer, install required plugins, and lastly a link to support. Here you can (once logged in) open a support ticket if you’re having issues.
Which I don’t think you will have in all honesty, especially with detail the theme documentation goes into.
With Me So Far?
With me still? Good stuff. I’m going into as much detail as I can. You need to know if the Foodica theme is going to be a fit for you. Next up the customizer.
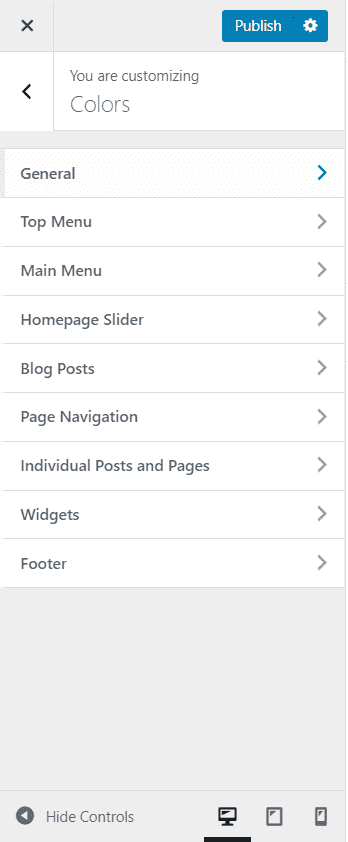
Theme Customizations
I’ve covered theme options for
Let’s cover every single one of the customization options available. I did say I like to go to town.
Site Identity
Always an option no matter what theme you use for WordPress. It’s here you can give your site a title or choose a logo to be displayed at the top of your website/food blog.
If you don’t want to display a logo, you can add a text title here. Font options for the text logo can be set further down the customization options.
Regarding the logo, it would have been nice to have a recommended size for logos here. I’ve seen it before in some themes, and they usually have something like recommended size 720 by 90 pixels or something to that effect.
A minor gripe, so tinkering with a logo will be required to get it just right.
Typography Options In Foodica
I actually can’t get them all in on one screenshot; there’s so many!
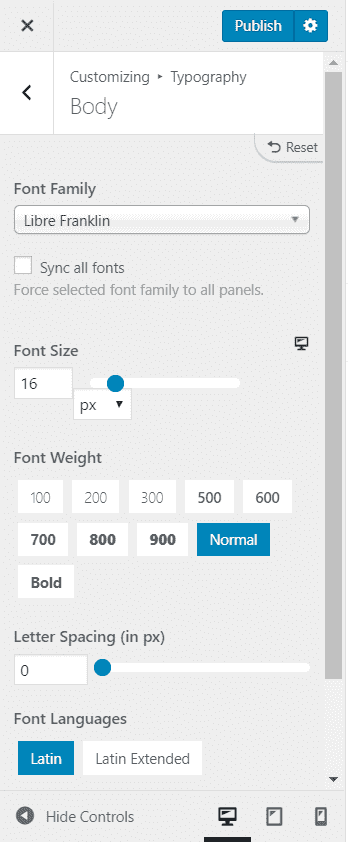
Heres what’s covered, so that you know:
- Body
- Site title
- Site description
- Top menu links
- Main menu links
- Main menu links for mobile – sweet feature!
- Homepage slider title
- Homepage slider description
- Homepage slider button
- Widget title
- Blog posts title
- Sticky posts title
- Single post title
- Single page title
- Footer menu
There is support for standard fonts, popular fonts from Google, and all of the fonts available from Google. Of which there are loads to choose from.
Worried about using Google fonts, don’t want to use them? Then use the standard fonts for your titles, buttons, and more.
You can choose the font size per option, the thickness, letter spacing, and more. So getting the right font for your food blog is a cinch.
Color Options In Foodica
A boatload of color options is at your disposal here. Let’s take a look at what’s available for you to play with.
General Color Settings
Here you have a stack of options. Covering the background color of your site, the body text, the site title (if you’re using text instead of a logo), links, and buttons.
From the native color picker, you can choose the base color, on hover color all from handy selector boxes.
Top Menu
Main Menu
Homepage Slider Colors
If you decide you want to show a homepage slide, then this is where you can change the color settings. With options for the slide background, slide title, hover, and meta colors.
Options available are, the category link and hover, post meta and link, hover states and the color of the slide excerpt if you decide to use pages instead of posts for your slide.
There’s also options for the read more button, such as text, background, hover and more.
Blog Posts
Here you can change the post title color as well as the hover color. Post details allow you to change the color of the category, meta, links, and there’s also settings for the read more button, including hover state .etc.
Not to be confused with individual posts and pages, this section deals with archives and category colors.
Page Navigation
If you have Jetpack installed and want to use it, this is where you change the color of the infinite scroll button, as well as the hover color.
Posts & Pages
Need to change the color of your posts from the archive/category colors? This is where you can do just that. With post/page title, meta, meta links, hover, text color and links in posts.
Under here there are also settings for the Recipe Blocks, where you can choose the block background, title, text color, divider color, and more.
Widgets/Author Bio Widget
Set the color of the widget title and the title background. There are also settings for the author bio widget, with button background colors, hover, text color, and hover color as well.
Footer Colors
Color Schemes
If you’re not the creative type or have difficulty choosing a color scheme, then this is for you. There are some beautiful preset colors you can set, that should appeal to you.
By setting one of these presets, you can drill down and choose different colors from the color settings to tweak and get it just right.
You can choose from:
- Default
- Dark
- Dark Green
- Light Green
- Pink
- Yellow
- Orange
- Teal
- Turquoise
- Red
Header Options
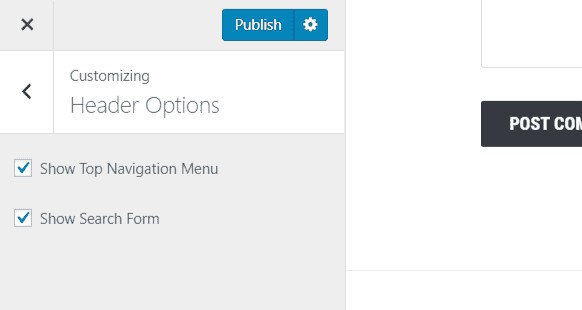
The search form is a given; people like to find what they are looking for or other articles of interest. So for me, this needs to be displayed. You have the option of disabling them both should you need to.
Slider Color Settings

Should you choose to enable a slider on the homepage, be it from featured posts or pages, here, you can select the background colors.
There are, in fact, three different choices for slider styles, they are: Default, without gradient and lastly transparent.
The default shows you a background gradient color box. Here you can choose the start color and the end color. You can also select the direction of the gradient from horizontal, vertical, and diagonal left and right.
As well as options for the start color opacity, end opacity and the location for start and end.
Without gradient and transparent removes the gradient color box. I had a play around with it, and it works like a charm. Horses for courses on this one, either go with a gradient, transparent or remove it.
Widget Areas In Foodica
The other options in the customizer are the same as they would be with any other theme. Foodica’s customizer (or at least the options that are theme-specific are different in color so you can see what they are. That being said, we need to take a look at widget areas.

There’s the good old fashioned sidebar widget area which is the primary one.
- 1. Homepage below the slideshow if you choose to use a slideshow. As well as three more.
- 2. Homepage below the slider, you have 3 to choose from. They split the content up, handy for adding in block sections to point visitors to other areas of interest, like social networks, deals, newsletters, etc.
- 3. There’s a featured categories widget so you can highlight categories you think might be of interest to visitors.
- 4. Widgets for the single post before content and after. Useful for newsletters, offers, advertising .etc.
- 5. Then footer widgets, choose between 0-4 in the native customizer.
- 6. Instagram Bar, this is shown throughout the site thanks to the WPZoom social widget plugin.
- 7. The WooCommerce sidebar, I like this. Many themes lock you into just using the standard sidebar with no clear distinction or dedicated sidebar, so to see this is a good thing.
- 8. Header social icons, if you choose to show the top navigation bar, you can add a widget to display icons of your social networks, or not as the case may be.
- 9. Recipe index sidebar, as I mentioned previously in this review of Foodica, the theme has it’s on archive for recipes. Here you can add widgets to be displayed on the archive pages for recipes. Pretty cool.
- 10. Footer disclosure, if you’re using affiliate links, you can add a text widget here to explain that. Or create a new menu with some links to your disclosure page etc.
- 11. WPZoom Tabs Widget area. Whatever you place in this widget will be shown in a tabbed format. Now placing content here will not show up on your site. Weird? Well no, this widget serves as a widget in a widget.
- Place content that you would like to display in a tabbed format. Once done, add the widget titled “WPZoom tabs” to an area of your choice, and your content will display like this:
Staying With Widgets
So I’ve covered widget areas, what about the actual widgets themselves? Again in a somewhat handy fashion, widgets that are relevant to the Foodica theme are light blue. There are 11 in total. Let’s take a peek at what they offer.
Featured Category (Homepage)
This widget will show a featured category of your choosing. Give your widget a title, choose a category, and choose the image aspect ratio you’d like to display.
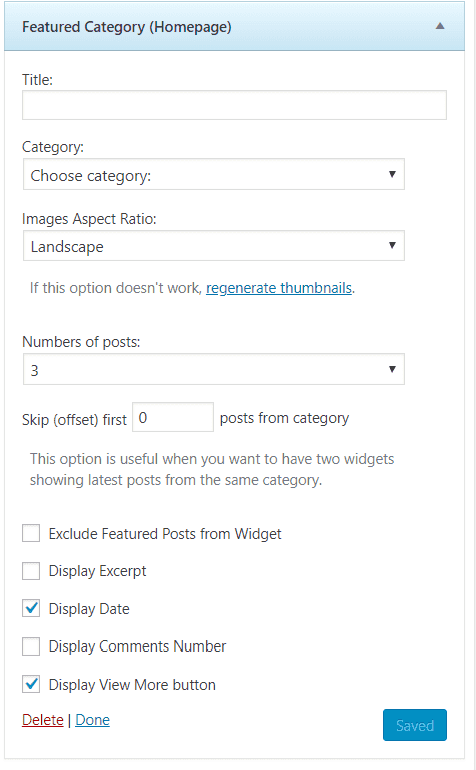
Like earlier settings, you can choose from landscape, portrait, or square. You can also choose how many posts you’d like to show 2-12 posts in total.
The next option deals with whether or not you will be displaying more than one widget in your section.
You can skip the first (enter a numerical value) from a category.
For example, you didn’t want to show the same post from a category even though the widgets will all be the same category.
Here you can add an offset to skip whatever amount of posts you’d like.
More options, this time you can exclude featured posts, choose whether or not to display the excerpt, date, amount of comments, and lastly the view more button. All enabled or disabled via a checkbox.
Featured Category Sidebar
Pretty much all the same settings as the Homepage Featured Category widget. I’m not going to show you a screenshot, not because I’m lazy, but it’s mostly the same as the Featured Category widget but for a sidebar.
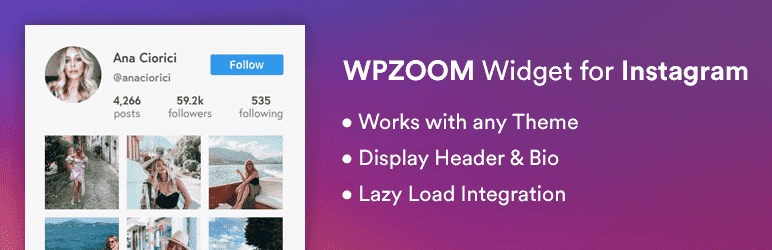
Instagram Widget By WPZoom
Anyone who is in the food blogging business will no doubt state that imagery can make or break a blog about food.

Food lends itself incredibly well to imagery; everyone likes to view images of various dishes. So if you’re into photography, have Instagram, then this widget is for you.
If you place this widget in the Instagram bar widget area, it will show site-wide. If you put it in a sidebar, it’s a different kettle of fish, thanks to the various options available to you.
First of all, you don’t have to install this plugin. It’s completely separate from the Foodica theme. It’s not required (although it is recommended as an installable plugin).
WPZOOM Social Feed Widget Plugin
I suppose this is a mini-review of the WPZOOM Social Feed Widget to a degree. See below for the Social Feed settings, it’s in settings > Instagram widget.
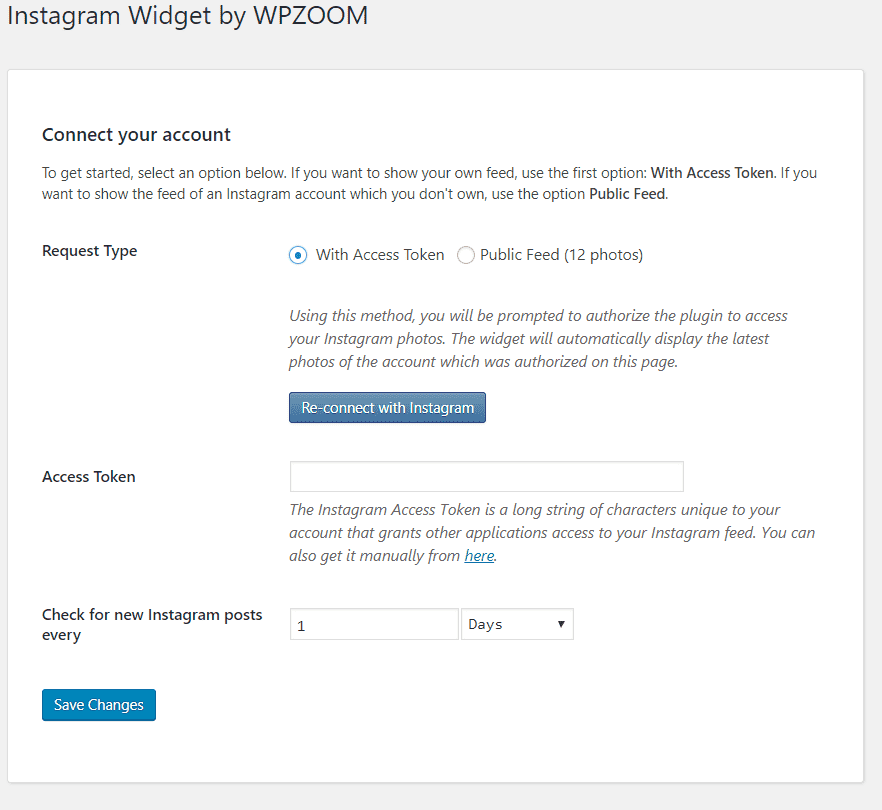
First things first, you don’t have to use this widget. If you have an Instagram account full of awesome pictures of food, then you might want to partake in it.
Here you can sign in with Instagram and pull in your pictures via an Access token. If chosen, it will automatically show images from your feed.
Under this is an input box to check for new Instagram posts every specific time from 1 minute(s), hour(s) and lastly day(s).
The other option is to use the public feed, which is limited to 12 photos and requires no access token. A useful alternative if you don’t fancy the idea of using an access token.
WPZOOM Social Feed Widget Settings
First up, you can give your widget a title if you want. Choose the number of images you’d like to display for your sidebar. As well as setting the number of images you’d like shown per row.
The default option is 3; obviously, this will depend on where you want the widget to display, as to how many per row.
You can also change the image width in pixels and the required space between the images. Note that this is a guide of sorts and that the widget will calculate the number of images per row and width to ensure they work on all devices, think mobile phones and such.
If you’re using the token way of doing things you don’t need to add your name in the @username box; it will be added automatically.
If however, you decide not to use the token method you can add your username here, and it will pull in the last 12 images from your feed.
Another useful option is the set forced resolution setting; the default is the algorithm; there are settings thumbnail, low resolution, and lastly standard resolution.
Under this, we have a range of options via a checkbox system. Display user details, bio details, show an Instagram button, overlay with comments/likes, lazy load images, and hide video thumbnails.
Under this we can set custom text for the button, default is View on Instagram, but you can change it to whatever you need.
How Does It Look?
Take a look at the screenshot with all the bells and whistles activated. You can play around with the settings to get it to display how you would like, and this is just an example of the output.
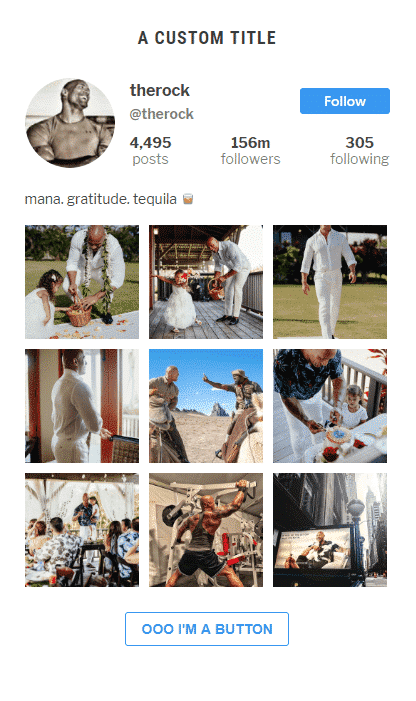
For me, I like the flexibility of this plugin/widget. And if you have a following on Instagram, it could prove beneficial in making new visitors aware of your social profile.
A bonus when clicking on an image or button within the widget opens a link in a new window — keeping people on your website, instead of sending them off to Instagram.
Social Icons Widget
Another widget this one deals with social media. Set a custom title for your widget and add some text above the icon.
Something that makes them stand out, or leave it blank, totally up to you. There are a series of checkboxes under the custom HTML box, the deal with the following.
Show icon labels, open links in a new tab, add nofollow to links, no referrer, and noopener. Icon alignment you can choose from none, align left, right, and center.
Padding for your icons, here you choose in pixels how much distance you want between each icon, under this the size of the symbols.
From a color picker, the next two options deal with setting the colors for all icons and the hover color. Useful if you want a uniformed color scheme for your food blog.
Social network selection, here you can add the links you’d like to display in your widget along with an associated icon to denote said network.
Icon Settings For Widget
This widget uses various sources for the actual icons, see the below screenshot for details. What’s good about this is you can choose a specific color and hover color per social network.
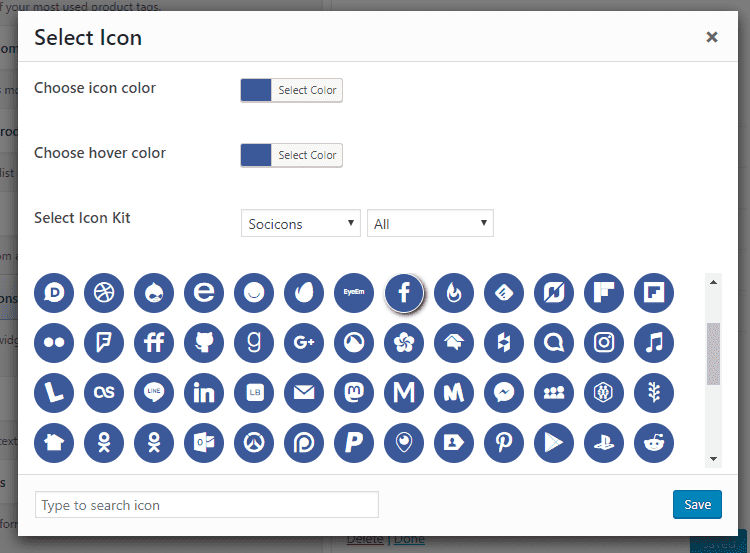
With a varied selection of icon kits to choose. Such as Socicons, Dashicons, Genericons, Academicons, and Font Awesome.
There’s a handy search icon box for you to narrow down your criteria and find something that fits your brand/design.
You can also create a separate widget and add it to the Header Social Icons widget area, so your social presence is displayed. I wouldn’t use both, but hey it’s your food blog.
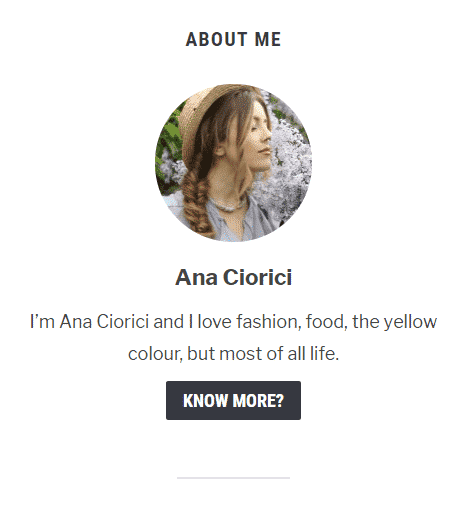
Author Widget
Again completely optional you don’t have to use this widget or any others the Foodica/WPZOOM offers. If however, you’d like to display some information about you to your readers this is where you can.

Here you can add a title for the widget, your name, and an email address for your avatar. The avatar is pulled in from Gravatar so you will need to use an email address that links to the avatar of your choice.
You can set the picture size in pixels, and there’s an HTML box for you to add info about you as an individual.
The next two inputs allow you to add some text for a button and a URL, so you can link to your about page which goes into more depth about you and your food blog.
Author Widget In Action
I like the author widget, it displays nicely and highlights you as the content creator, it’s as at home in the sidebar as it could be at the bottom of a blog post.
Carousel Slider Widget
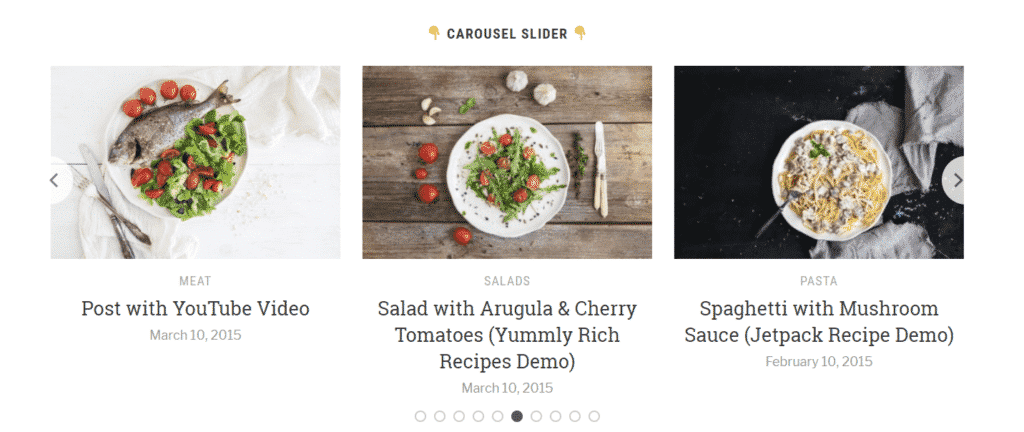
A sexy widget, can I say that? Well, I’m going to regardless. Take a look at the output, a pretty sweet way to showcase posts from categories right?
Carousel Widget Settings
Here we can name our widget which is shown on the front end, and choose how many posts we would like to display.
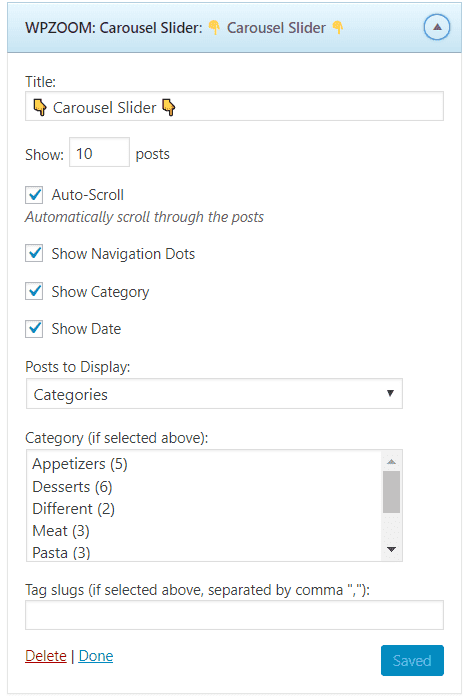
The other two options deal with whether you’d like to show the category and indeed date on your front end.
You have a choice of archives in the posts to display, and you can choose categories or tags.
If choosing categories, you can choose from the ones listed in the selection box, highlight them all or choose a couple, whatever you think works.
If you choose tags, then you need to enter them in just under the category selection box, separated by a comma.
This widget looks excellent just under the homepage slider, as well as the single post after content widget area.
Image Box Widget
Nice and simple this one, give the widget a title, choose an image you’d like displayed and a link to where this clickable box should point to.
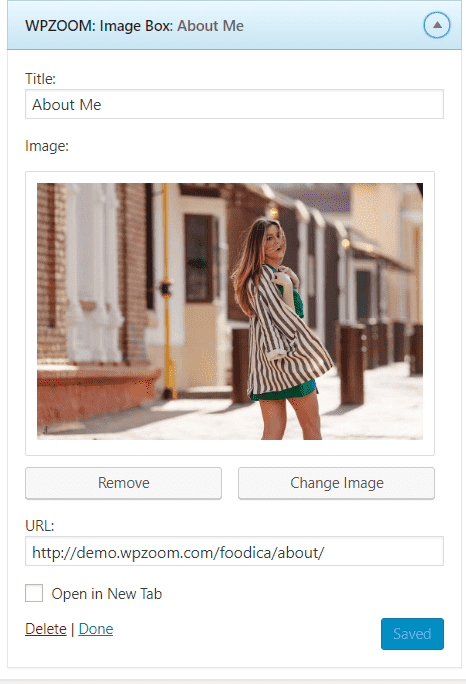
Bonus, you can check the box to make it open in a new window, useful for an Instagram link .etc. Once saved you will see this below on the front end of Foodica, whatever widget area you choose. It has a faint outline of a white box, which gets stronger on hover.
Also, your widget title is displayed centrally in the box, so make sure it’s not overly wordy, so it looks the part.

Popular Recipes By Comment Count
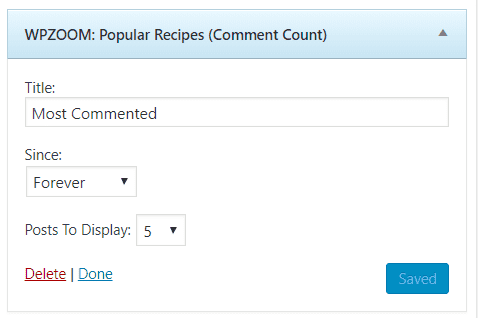
This little widget will show the most commented-on recipes, and you can choose an amount to display between 1-10 posts.
I’d recommend no more than 5. That way your sidebar isn’t too big! You can also set the time frame, choose from Forever, This Year or This Month.
Popular Recipes By Views Widget
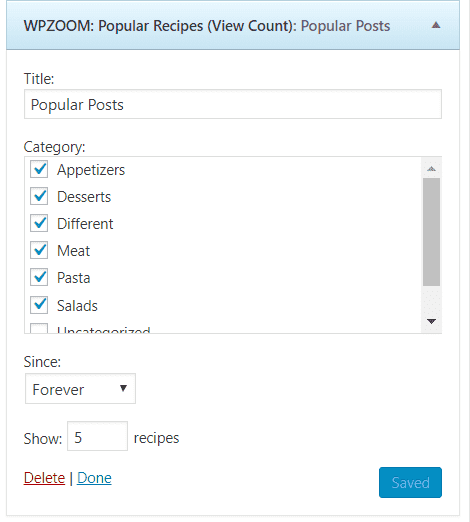
The same options are available here as per the previous widget. This one has an additional option to choose from a range of categories.
Useful if you have a range of categories for your blog, that not actually recipes.
Recent Posts Widget
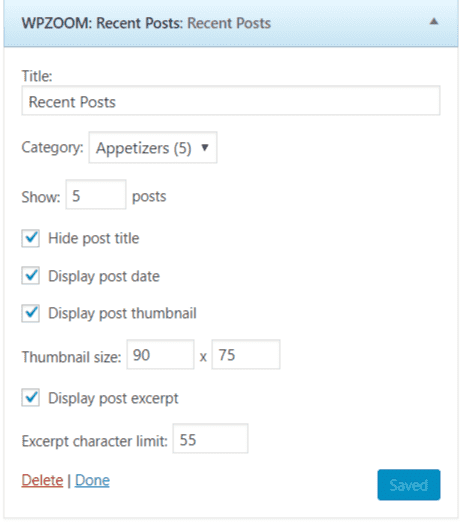
It’s worth noting there are a lot of widgets to Foodica, you don’t have to use them all for the record.
This particular widget deals with recently posted articles on your food blog. Give the widget a title, choose a category or choose all, and select how many posts you’d like to display.
You can hide the post title, post date, and post thumbnail if you like. Or uncheck the boxes to show them, as well as choosing a thumbnail size.
The size of the post thumbnail is set to 90 pixels by 75 pixels. Lastly, you can choose whether to show a post excerpt and limit the number of characters that will be displayed.
Page Templates
Foodica has a few different page templates at its disposal. Here you can choose a template you’d like to use for a specific page.
The choices are, Default, Archives page, Full-width page, Full-width page (page builder), Homepage (page builder), Homepage, Recipe Index (Group by category) Recipe Index (List), lastly Recipe Index (Infinite Scroll).
Foodica supports page builders, so fans of the likes of Elementor, Beaver Builder, Site Origin and WPBakery are catered for.
When selecting a page template with (page builder) after the name, it turns it into a full-width page, ready for you to add your content through your page builder of choice.
Posts In Foodica
You can choose whether to go full-width in post style or go with the sidebar option. Useful if you have some great content you’d like to go full-on full-width with. Or if you just wanted to differentiate between recipes and blog posts.
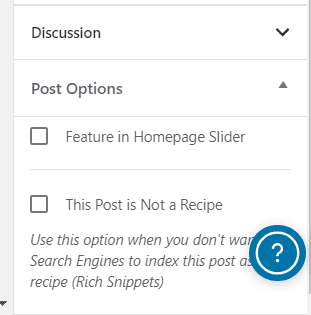
There’s a setting in the Gutenberg post editor to let you choose between standard post, mark the post as a recipe and even add it to the homepage slider.
If you’re not using Gutenberg and prefer the classic editor, at the top of the post edit screen is a box to allow you to do the very same.
This, in turn, leads me to a new addition in your WP admin interface. Featured posts.
Featured Posts
Want more granular control over your featured post order? A new addition in the back end under the posts section entitled “Featured Posts” is for you.
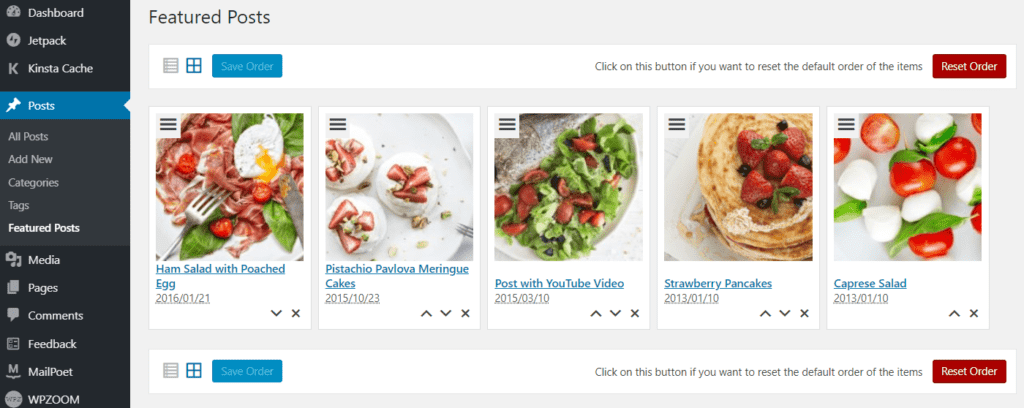
It’s here you can view your featured posts in a list or grid format (via a simple toggle) and drag and drop to the order of your preference.
Useful if you’d like to highlight a particular recipe/post. By default, the post slider will take the order of your posts by date.
Recipe Block In Foodica
Now, this is interesting thanks to the WPZOOM Recipe card plugin for Gutenberg. It’s a new plugin that lets you create recipes with the appropriate schema to show up on in a nicely formatted way in search engines.
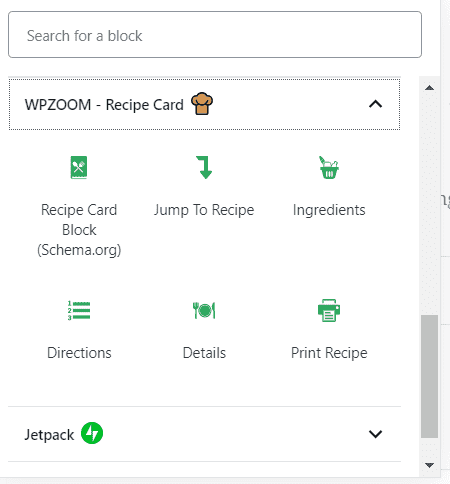
It’s interesting nonetheless, so lets take a look into it.
WPZOOM Recipe Block Settings
Further down the rabbit hole, we go. There are settings (if you decide to use this recipe block) you’ll need to configure.
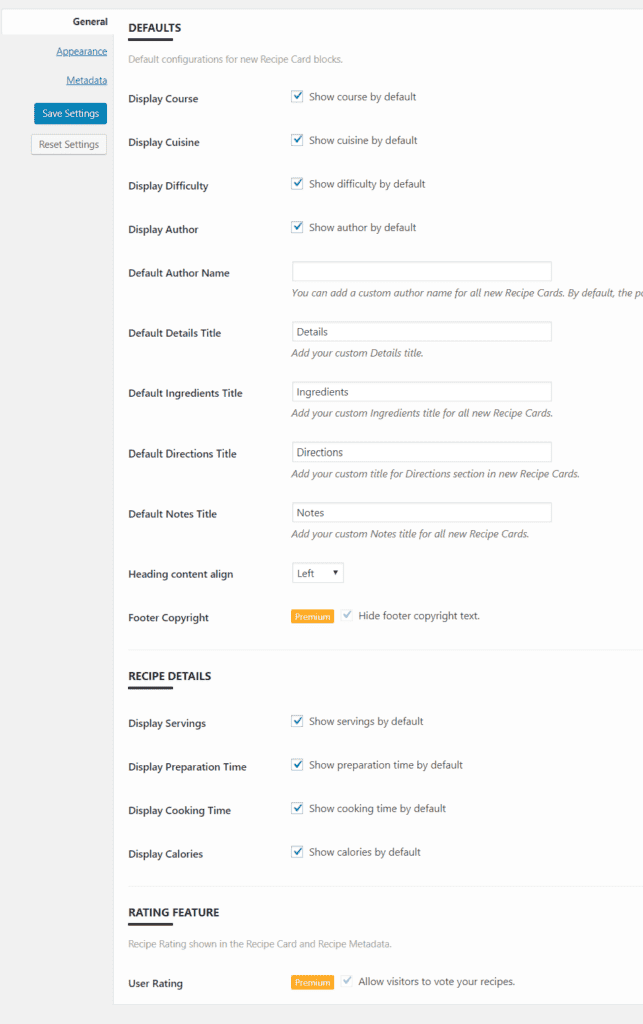
General Settings Tab
Here you can choose from a varied selection of options to enable or disable specific elements from displaying in your Recipe block.
So your recipe card will show the words “RECIPE CARD PLUGIN BY WPZOOM.”
There are even more options that cover recipe details, show as enabling servings, prep time, cooking time and calories.
Recipe Template Settings
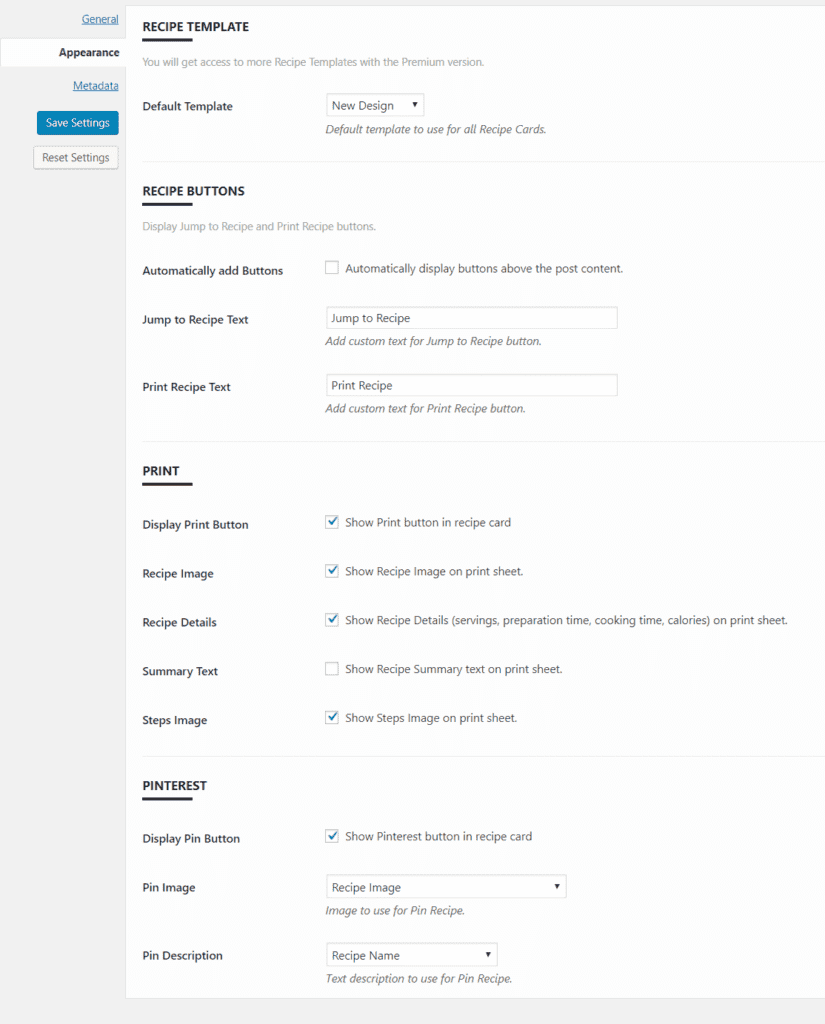
This section deals with the front end display in terms of design. Here you can change the default template to new design or simple.
Button options next, you can automatically display buttons above the post content, and change the text for a jump to recipe and print recipe.
The next load of options deals with the print display. Some people like to print recipes off and follow them on paper.
Here you can choose to show the print button in the recipe card, show the recipe image on the printed sheet, show details on a printed sheet such as servings, prep times, etc.
Also, options for whether to hide or display the summary text and steps image on a printed sheet. Excellent possibilities to have, WPZOOM has made this a bit special.
This now feels like a review of the WPZoom Recipe Block plugin! Last up, Pinterest. Pinterest works well for food bloggers; decent quality images of your food can attract a wealth of hungry eager to learn visitors.
Here you can check the box to show the Pinterest button in your recipe card.
Meta Settings
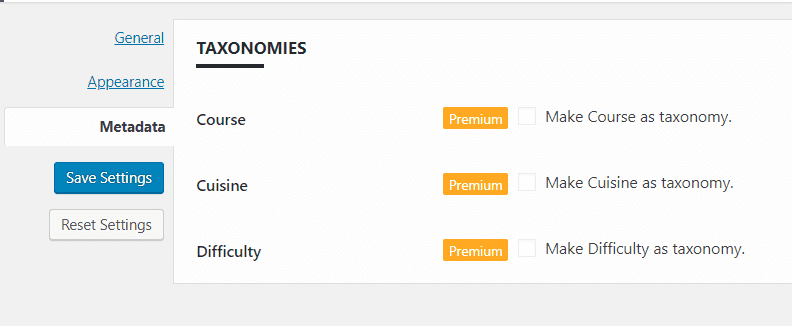
Great features. Especially for those who want to highlight easy to cook recipes and specific cuisines.
Back To The Recipe Block
Adding a recipe block is a breeze. Click on it and add it. Once done, you will see a block ready to fill in your delicious recipe.
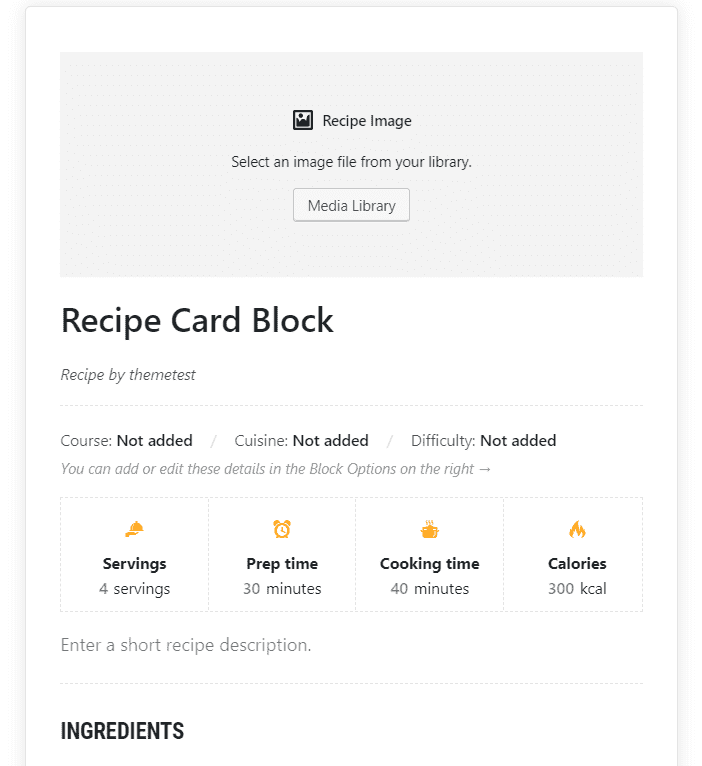
We have the recipe image at the top, so make sure it’s a sexy one — the title of the recipe, the recipe author. Next up we have a course, cuisine, and difficulty; these options are changeable from the block sidebar.
Under this, we have servings, prep time, cooking time, and calories. You can amend these numerical values by clicking on the number or by using the block editor sidebar.
We need to look at the block editor sidebar for this recipe block. So let’s do that instead.
Recipe Card Block Editor Settings
Here you can change the style on a per recipe basis if you wish. I know I covered the plugin settings previously, but you can change them on a post by post basis here.
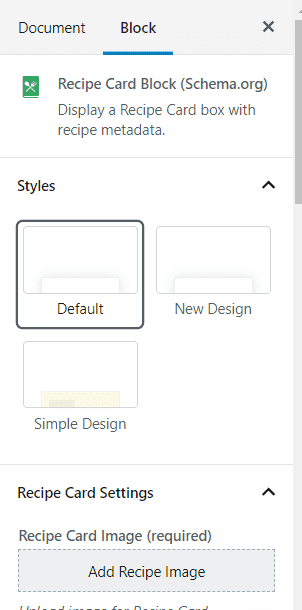
You can allocate an image to your recipe block, choose to display a print button, Pinterest button, header content alignment, and much more. Choose to display an author, and there’s even a space for a custom author name if you desire.
Recipe Card SEO Settings
You won’t see this on my screenshot. There are useful helpers (toggles) that guide you through what is needed from an SEO perspective to ensure your recipe block shows up accurately.
There’s even a structured data test, highlighting what you need to show, what areas require attention and more. This plugin is the nuts, but I’m not reviewing the recipe plugin, I’m examining Foodica.
So I’m going to leave it there on this plugin.
I Don’t Use Gutenberg
You don’t have to use Gutenberg. Many don’t like it, I do, but hey it’s a personal choice. If you’re using the classic editor, you can still add a recipe. Thanks to a couple of new additions to the editor itself.
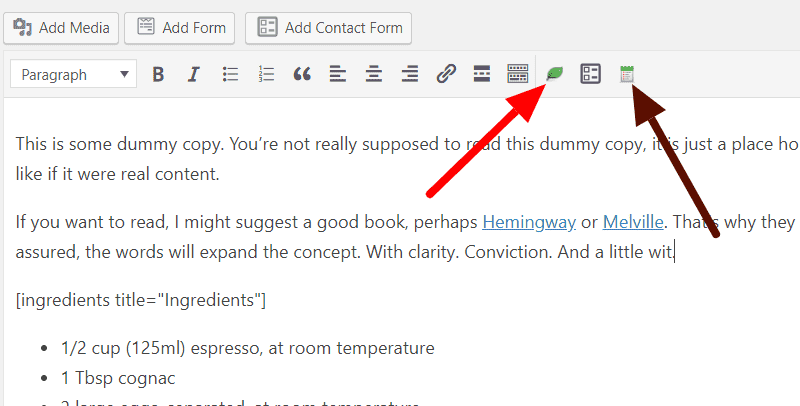
The first arrow (the red one) indicates a shortcode insert for ingredients. The second arrow (whatever color that is) highlights the directions.
Both will insert shortcodes for you to amend and get your recipe looking just right. This method does not use the WPZoom recipe card block; it’s a different beast.
Other Recipe Methods
If you don’t want to use the JetPack recipe plugin by WPZOOM, or the post editor method, there are a couple of other recommended plugins Foodica recommends. I’ve not tested them; this review would read like war and peace if I did.
Foodica also supports, Yummly Rich Snippets plugin available on WP.org and the Easy Recipe plugin.
Weirdly neither of these has been updated for the last three releases of WordPress. Another reason I’m not going to add them into the mix (forgive the joke) I’m not going to cover something out of date.
Page Speed Of Foodica Theme
This is a relatively new thing for me. We all know the importance of a fast loading site for search engines and users. It’ critical these days, so how does Foodica stack up in the page speed stakes? Let’s take a look, and I hope it does well, as I quite like it so far.
My page speed test will use Google Page Speed, Pingdom and lastly and WebPagetest (WebPagetest makes the grade due to a recommendation on Twitter, thanks by the way).
To give a true reflection of site speed. I have deleted the demo theme content as it includes me tinkering around and testing. So I’ve removed all the content and am now re-installing the demo data.
Plugins installed and activated are:
JetPack, MailPoet, Rating-Widget: Star Review System, Recipe Card Blocks by WPZOOM, Social Icons Widget by WPZOOM, WooCommerce, WPForms Lite, and lastly WPZOOM Social Feed Widget.
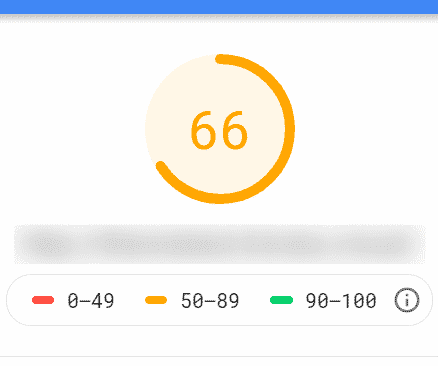
Google Page Speed Desktop
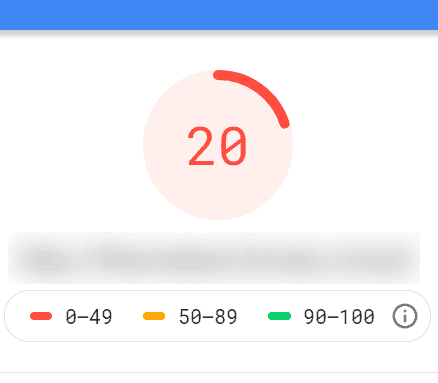
Google Page Speed Mobile
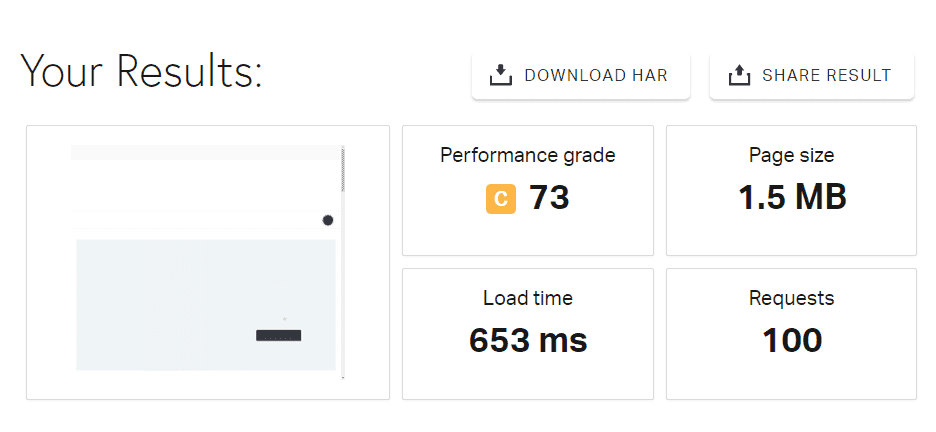
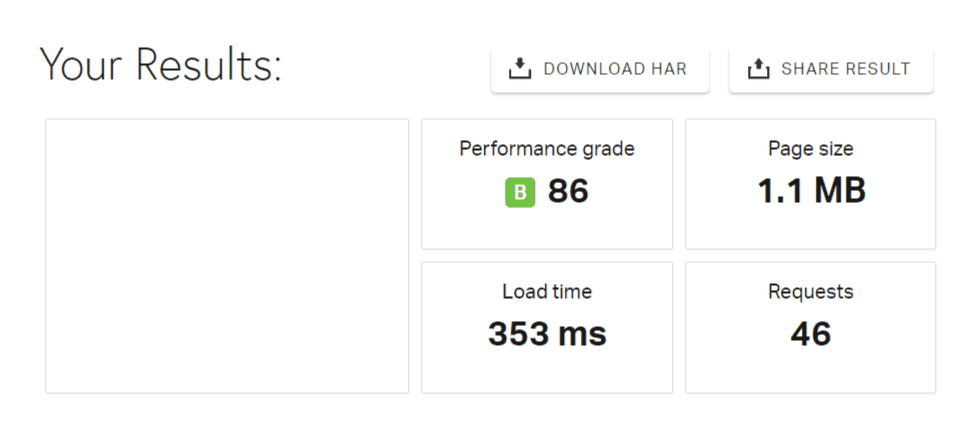
Pingdom Page Speed Result
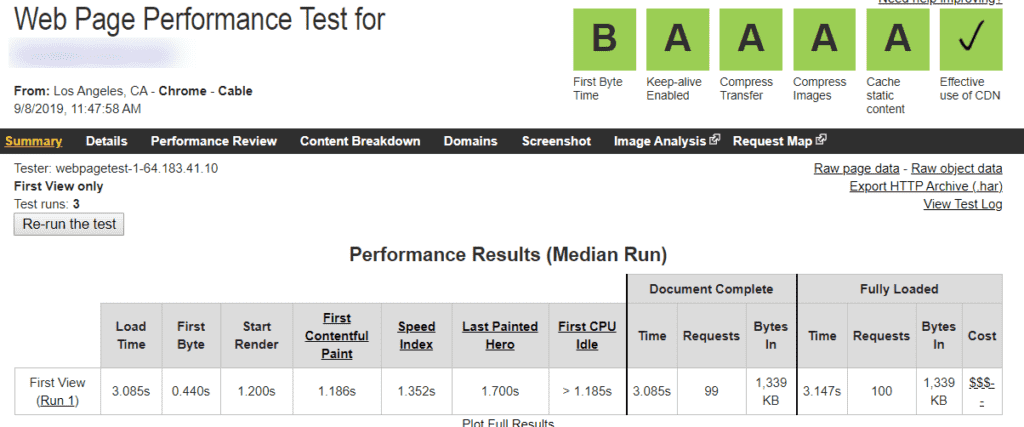
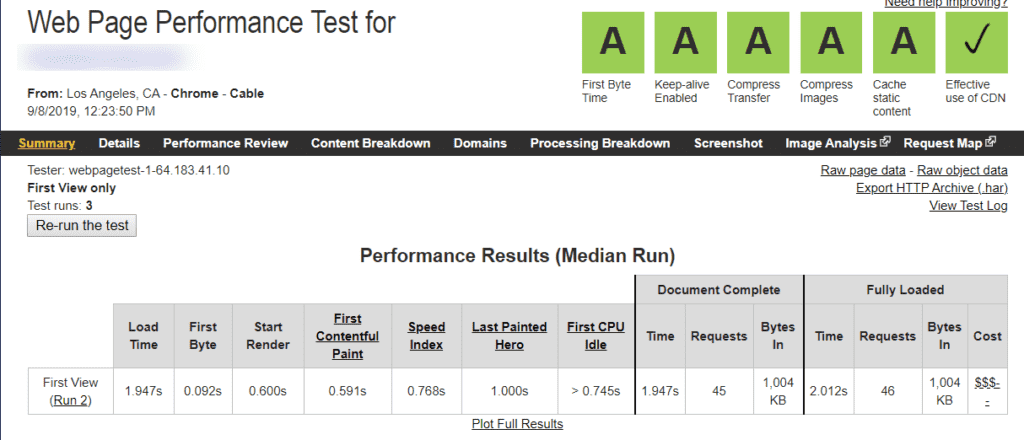
Webpagetest Speed Result
Not fantastic in terms of mobile from Google’s results, do bear in mind though, this page speed test was performed with all the plugins installed and used the homepage as a speed test. I have a feeling by deactivating some of these plugins we will see better results.
I’ve invested so much time in this review, and I like Foodica, I’ll be damned if I cannot get it working faster. So how can you make the Foodica theme run quicker?
How To Get A Better Page Speed For The Foodica Theme
Looking more in-depth into the page speed results, I noticed some significant offenders were causing the speed to be slow. Google Fonts was one, so I choose standard fonts (Helvetica) for the website rather than relying on Googles.
Next up I deactivated Jetpack, Rating-Widget: Star Review System, Recipe Card Blocks by WPZOOM, Social Icons Widget by WPZOOM and lastly WooCommerce. What happened?

Google Page Speed Desktop
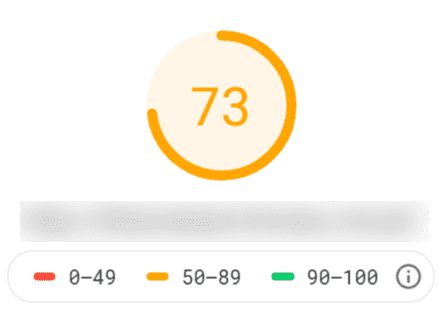
Google Page Speed Mobile
Pingdom Page Speed Result
Webpagetest Speed Result
Of course, there are other things you can do, such as reducing image file sizes, compressing them, use a performance plugin, caching plugin, and more to make Foodica quicker.
Pros
- Simple to use, I know there’s a lot of options to it. But they are options, and you don’t have to use every single widget.
- Recipe index, love the way this is put together and being able to sort them by category .etc.
- Love the widgets and the widget areas, mixing and matching is fun, and there’s plenty of ways you could market your food blog through them.
- Excellent options for advertising.
- I love the recipe plugin block for Gutenberg – not taking this into account with my final score for the record!
- WooCommerce support, so you could potentially sell products to coincide with your recipes.
- You don’t have to be a food blogger to use Foodica. It could be utilized for a wealth of different applications.
Cons
- The footer link got to say I couldn’t find a way to remove the link that points back to WPZOOM. You have to edit the footer.php file manually, and I know this as I had to Google it.
- I wasn’t a big fan of the notifications upon installing (again could have been my fault), so I won’t let this interfere with the final review score.
- Page speed isn’t great, not that you can’t rectify it you understand, be aware that you will need to tinker with it to get it to run quick.
Foodica Review Verdict
I’ve had fun with Foodica, this is my first actual review of a WordPress product, and I’ve had a blast. The first of many, I hope!
Foodica costs
If you like options and a clean aesthetic feel, then Foodica could be the ideal fit. Just be aware of page speed, only enable the functionality you actually need, be prepared to put some work in.
Foodica Review Score
| Criteria | Score |
|---|---|
| Design | 5 |
| Page speed | 4 |
| Functionality | 5 |
| Ease of use | 4 |
| Cost | 5 |
| Overall Score | 4.6 |
Subscribe To My Newsletter
Read it? Share it!
Leave a Reply