
Strong Testimonials Review
Website Testimonials Can Help Sell Products/Services
If you’re looking to attract business or generate new business there’s lots you can do, use persuasive copy, flashy imagery, special offers etc. There’s something else you can do and, dare I say it, need to do.
Add Testimonials to your website!
REAL testimonials from ACTUAL customers. Not copy that sounds exactly the same as the content on your existing site. I mean real feedback from people who have used your product/service.
Nothing tells you more about a product/service than real-world testimonials from customers. Sifting through the web (as you do), you’ve probably noticed highlighted boxes (usually with stars in them) stating how awesome XYZ company is.
These are your bread and butter.
You’ll also no doubt notice that testimonials are (more often than not) placed at the base of a web page, with a call to action underneath.
There’s a reason for this.
They back up your content prior, your features and benefits. All the content before the testimonials is to get people on board.
Testimonials, well, they can seal the deal.
Disclosure
This review is paid for by the owners of the plugin. They asked me to take it for a spin, and give my thoughts and feedback, without limitation. They have not been privy to the review prior to publishing, and have had no influence on the outcome/verdict.
Please note this article may contain affiliate links for the product, this does not affect your rights as a consumer. If you purchase the premium version through links here, I will receive a commission, at no extra cost to you.
*For all my reviews I use a clean installation of WordPress, I use InstaWP for this. It’s been invaluable in my reviews process, if you’d like more information on InstaWP, take a look.
TL:DR
If you’re pushed for time and cannot be bothered to read my in-depth review (no offence taken), please feel free to skip to the verdict on the free version here.
Strong Testimonials
Today, I’m looking at a WordPress plugin called Strong Testimonials, it’s designed to help you make the most out of your feedback, and help sell your service/product.
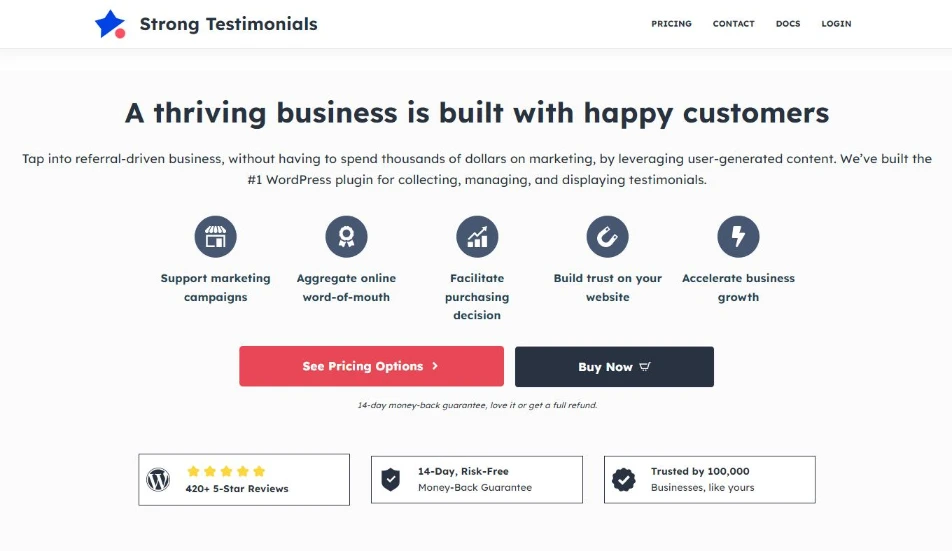
Strong Testimonials is actually available on WordPress.org and with over 100k users and an average user rating of 5-stars, you could say it’s kind of a big deal in the testimonial plugin landscape!
This review is of the free version, So if you need a new testimonial plugin, this review is for you.
Installing Strong Testimonials
I’m not going to guide you through how to install a WordPress plugin, you should know how to do that by now!
A quick search in my WP backend for “Strong Testimonials” and a few seconds later…
Installed, and after installation you’ll see the below screen. I’m not a fan of tracking, (see the pink highlighted box) so I’ve opted out of this. Have a look at the image 👇
As you can see from the above, you’ll note what I mentioned earlier. That testimonials come after features and benefits. This although a landing page to take you to docs, or a link to create your first testimonial, follows the same rule.
Strong Testimonials menu item
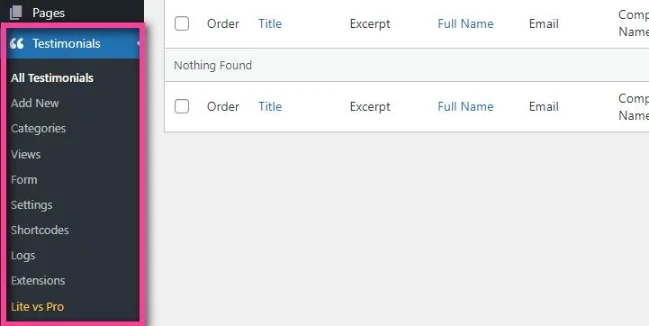
Strong Testimonials adds a new menu item, as shown above, it’s here you can add testimonials, categories and more. Let’s dive in. There are lots of options to go through, but on the face value, they look simple enough in terms of what they mean.
All testimonials, (not unlike post/page overviews) will display all current testimonials you have accrued.
What happens when we want to add a new testimonial?
Let’s find out.
Adding a new testimonial manually
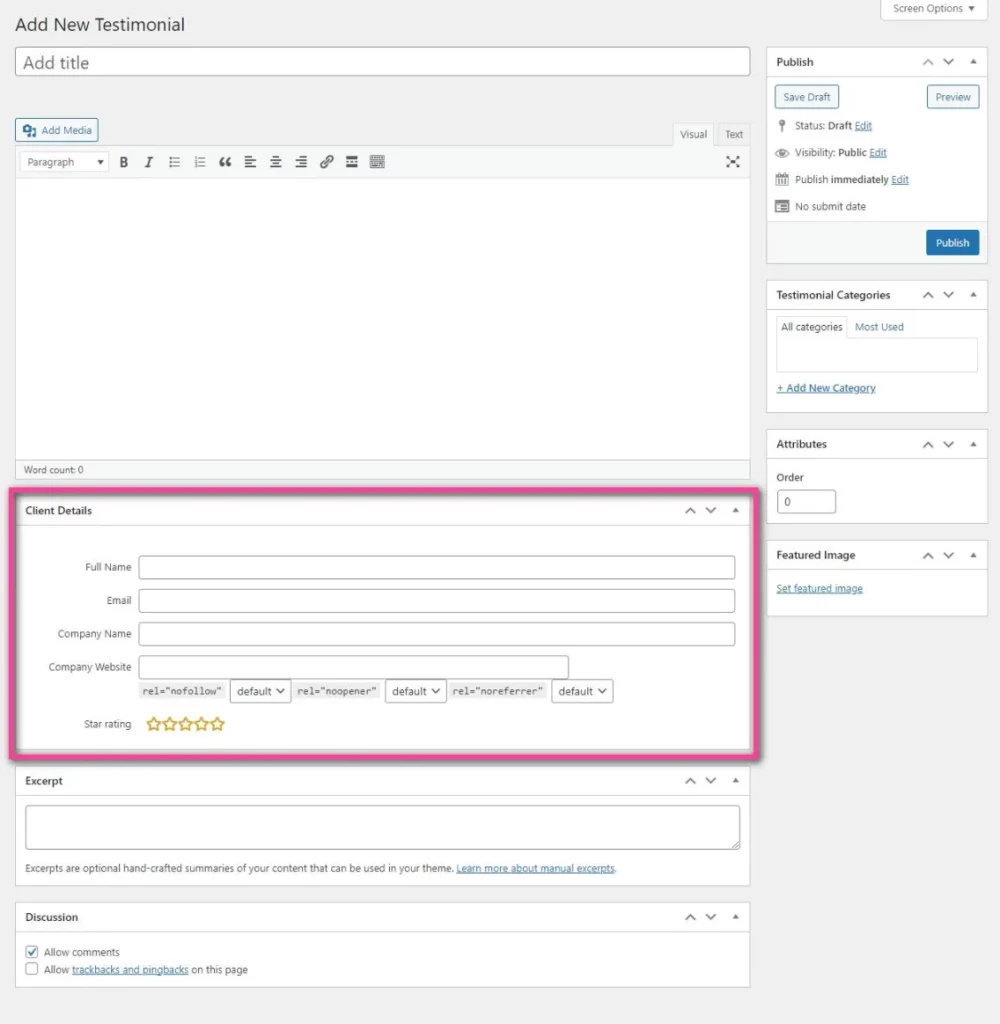
Adding a testimonial manually using Strong Testimonials is simple enough, this is done via the classic editor. I’ve purposefully drawn a box around something of interest.
Namely, client details. It’s here you can enter the client’s full name, email, company name and website of the company in question.
Just under these details, we have a few more options available to deal with the company website link. And lastly, the star rating!
I like the fact that I can decide to set the links to rel=”nofollow”, rel=”noopener” or rel=”noreferrer”. Also for those who’d like to know, the star rating is changeable, so don’t worry about making a mistake and thinking you can’t change it!
The rest of the testimonial post type page, allows you to set a featured image, and a category, you can add a category here, or visit the new menu item in the sidebar, and add a bunch of categories.
I’m going to go ahead and create a testimonial, so I have something to refer to, for further testing. See below for my input:
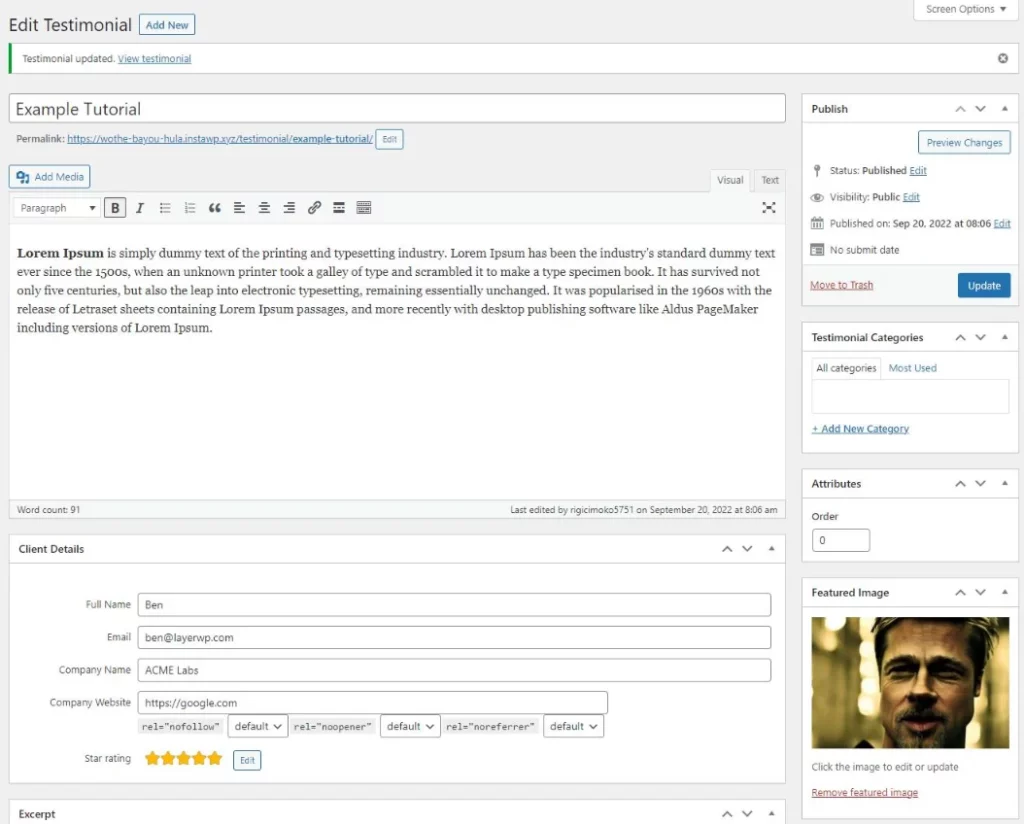
I’ve filled the above manual testimonial with some nonsense, it’s purely for testing, just to give me a base to work from. I’ve added a featured image, and silly me I’ve forgotten to give it a category!
Categorize testimonials
Easily rectified, categories are actually quite important. Why? OK, let’s say you have a multi department business. Tech Support, Sales, Engineering and so forth.
Creating categories for departments allows you to keep track of your testimonials, and of course, pepper them into content.
If you have a sales page, then it makes sense to showcase testimonials, relevant to that department, and of course any subsequent business units.
Views in Strong Testimonials
In order to showcase Views, I’ve actually added in a selection of different testimonials. Three in total, so let’s take a look at the views function.
The views option has quite a lot of settings, so I’m going to have to break this down into sections, otherwise the image would be huge! First up, let’s take a look at the top section.
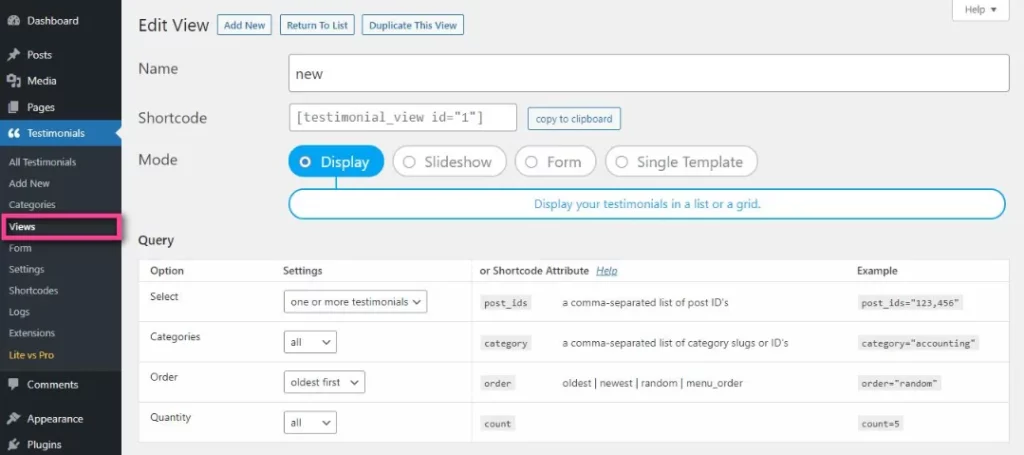
Here we can give our view a name (useful if you’re going to create lots of different views), under this we have the shortcode, with a handy “Copy to clipboard” function.
Next we have mode. Choice wise, we have Display, Slideshow, Form and Single Template.
Query settings in views
The view settings mean nothing without a query behind it. We need to tell our view, what testimonials should be displayed.
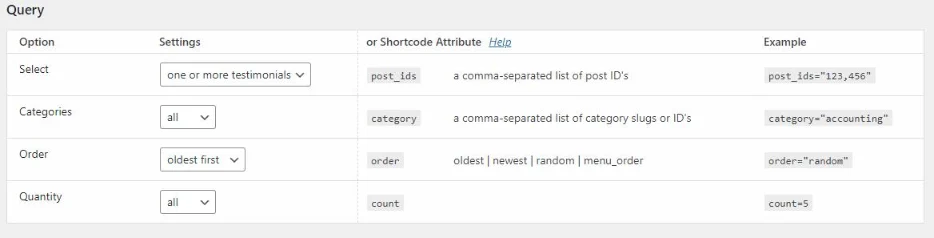
There are four options to a query, and again (so far) it’s all quite simple to understand. Select allows us to showcase one or more testimonials.
What if you wanted to select just one? Well using the dropdown option, you can:
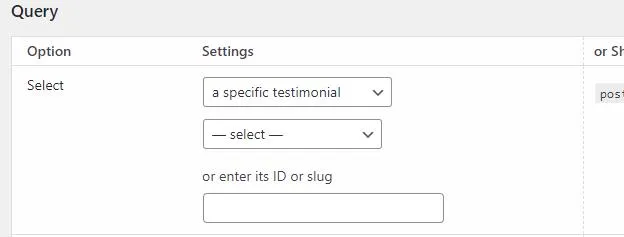
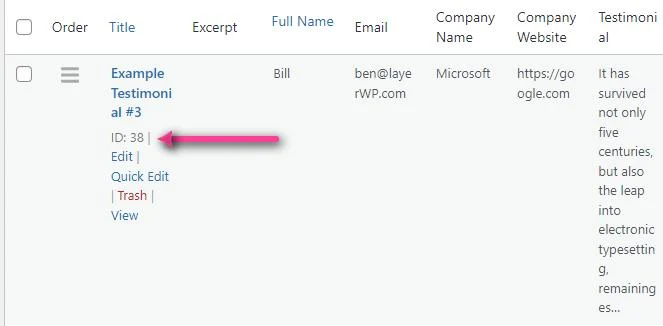
Here you can choose from a dropdown menu, or enter the testimonial ID or the slug (URL). To find the ID of any given testimonial, all you have to do is hover over the testimonial like below:
Categories, remember I said it was important to add categories earlier? Well, it’s not just for your mental benefit. Here you can decide a view and add a specific category, or display all categories.
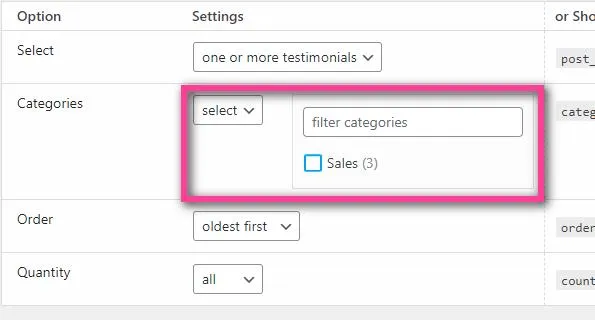
Option wise, you can elect to show all, or narrow it down by specifics. Love this function, it’s useful to me as a user. I can name my view relating to a specific category, then attribute the desired one to it. Incredibly useful if you have loads of testimonials, hey if you do, more power to you!
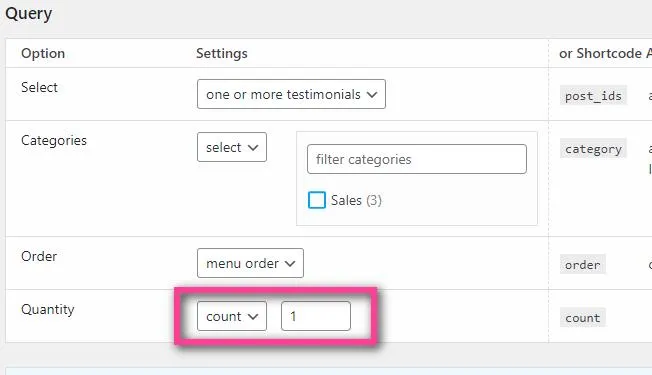
Order, this deals with the order of the testimonials. You can choose from, oldest first, newest first, menu order and lastly random.
Quantity, how many do you want to display? It could be overwhelming to have 10 or 20 testimonials on one page!
Thankfully, you can change this, via the dropdown, changing it to count, we can manually add an amount to display:
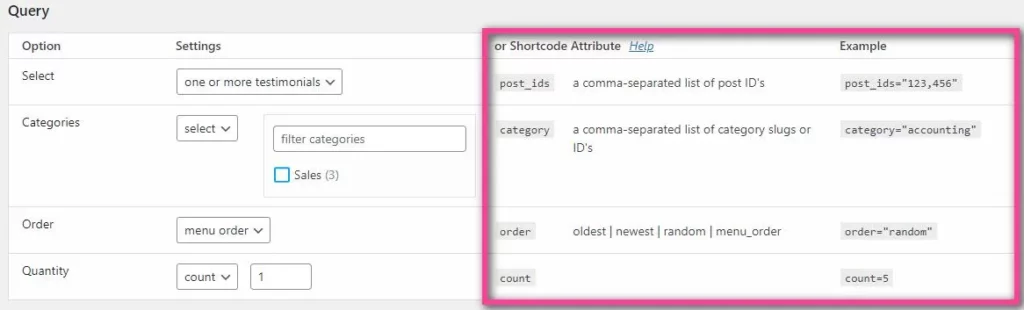
Shortcode attribues in views
So far, all of this functionality is completely free. This is the free version, I’ve not even touched on pro version functionality!
Another useful feature, Shortcode attributes allow you to define your own shortcode, each attribute is clearly marked along with examples. So you can tinker with custom shortcodes for your testimonials.
Fields in views
Well, there’s a prompt just before the Fields section, mentioning advanced views. This is in the pro version, which I will aslo review, but for now I’ll stick with the free version.
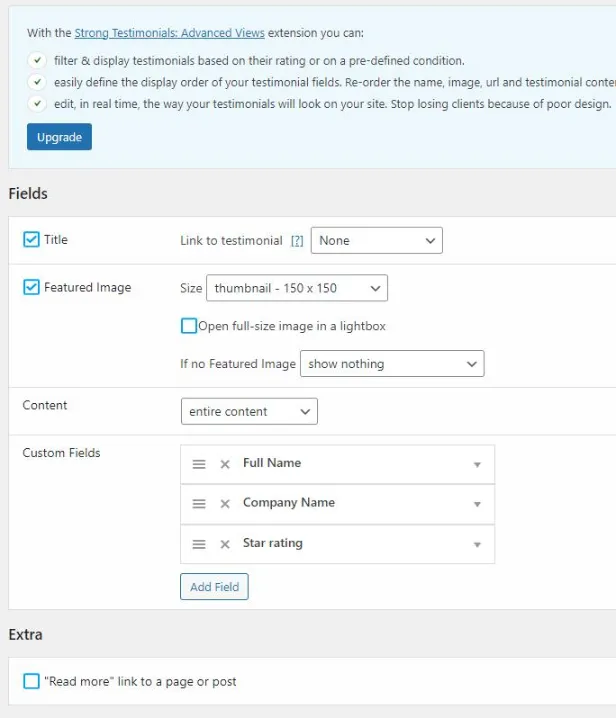
Title, this deals with how you want to link the title to the testimonial. You can choose from a Full Testimonial or the Company Website.
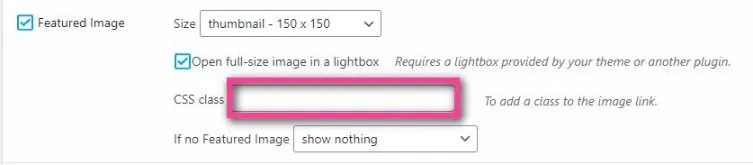
Featured Image, here you can select from a range of sizes for the image. Or if you’d like to display the image in a lightbox.
If you choose the lightbox option, you’ll need to have a plugin that supports a lightbox, if you do, you can manually input the CSS Class for it, see below for what I mean:
If you’d prefer not to have an image on display, a quick click on the Featured Image checkbox, will hide the images. The same can be done for the title as well. This gives you more freedom in terms of what you want to display, and of course what you do not.
Content settings in views
This is another great little feature. Here you can choose from entire content, and more. If you elect for the entire content, all the testimonial content will be shown.
What if someone has gone to town? Really gone that extra mile, and written a glowing and long testimonial?
It doesn’t make sense to show all of it! Well, you have options. Good ones, might I add.
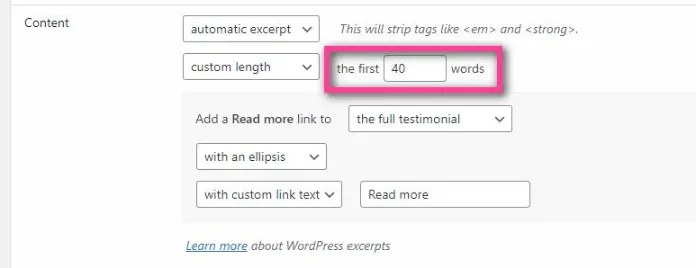
Automatic excerpt, now this is pretty sweet. If you have tons of testimonials, you could automatically reduce the amount of content shown, see below for the settings:

The default length is 55 words. This is WordPress theme dependent. If you wanted to increase or decrease this, you choose custom length as below:
I love this feature, it’s super handy for trimming down testimonials. But there’s another option, that of manual excerpts.
In order to explain this, I’ll need to go back into a testimonial, see screenshot below of manual excerpt entry:
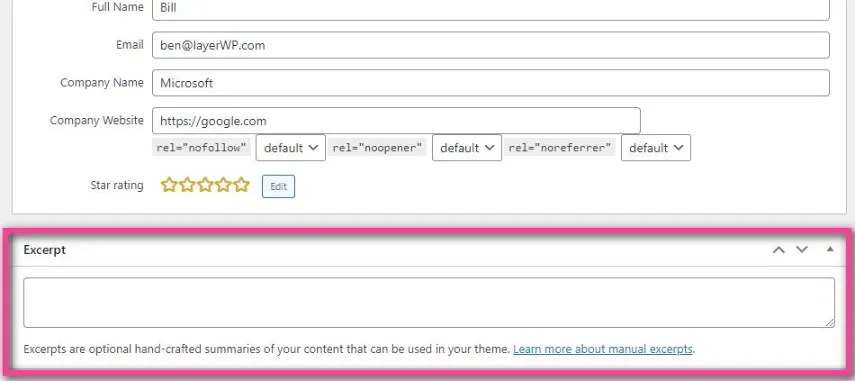
Similar in principle to post excerpts, anything that is added here, will be displayed if you choose manual excerpts.
If automatic excerpts are not for you, how about highlighting something catchy from the testimonial? Enter it here, and it will display if you decide on the manual excerpt method.
Still not happy? Want more options? What if the testimonial is super long, you want to cut it down, but you don’t want it to link anywhere? You don’t want to use manual or automatic excerpts?
See below:
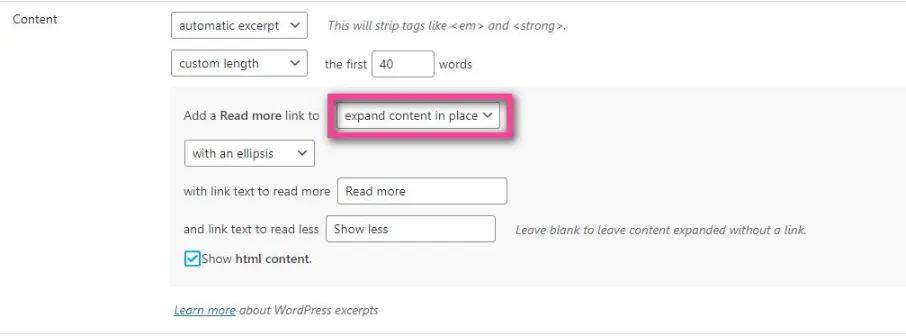
There are two options here, one is to link to the testimonial post (self explanatory), the other is to expand it in place.
By expanding it in place, basically, this means that users can view the complete testimonial, on the same page. I know, pretty slick, right?
If you decide to go down this route, you can choose the text on display, by default it’s set to Read more and Show less, but using the settings you can add your own description.
Chalk up another useful feature!
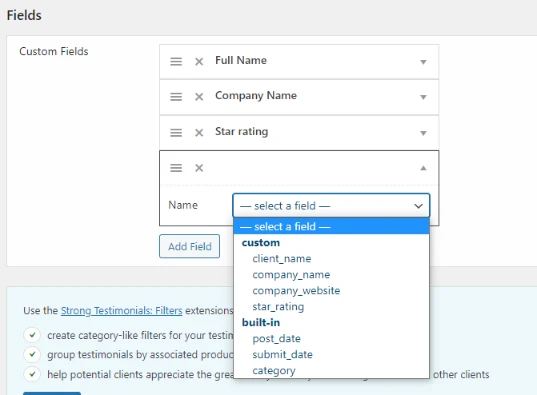
Custom fields in views
It might sound like I’m gushing over Strong Testimonials, and as this is a paid for review, you might be inclined to think, I’m trying to sell it to you.
You’d be wrong, it’s always fascinating to me, to see what developers/businesses add in terms of functionality, so far Strong Testimonials has it in spades. Truly.
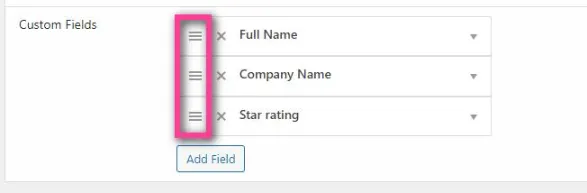
Now, onto Custom Fields. As you can see from the highlighted box (IDK why I chose pink, just run with it), these fields are draggable. So you can reorder to your heart’s content.
And, well you can add more if need be. See below:
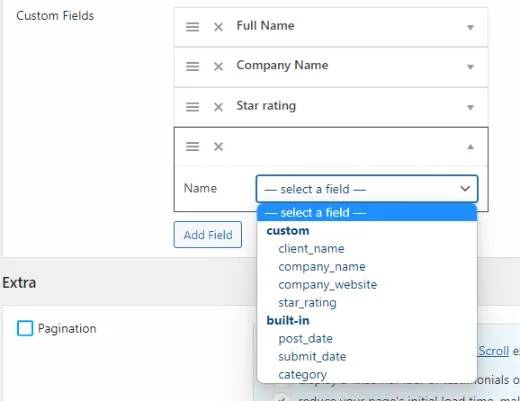
If you’d like to enhance your listing with custom fields, you can. Add things like display the category, the date it was posted, the client name, company name, star rating and more.
Then simply drag and drop the order you’d like to display them in. Super quick, super easy.
Extra settings in views
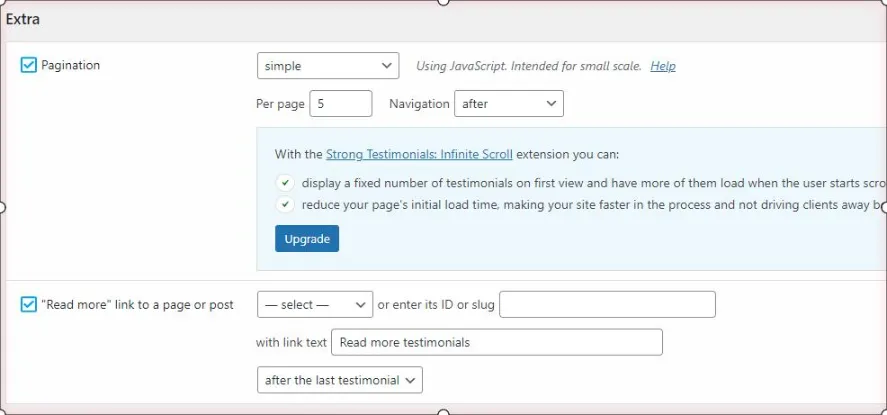
There are two options in the extra section. The first deals with pagination, for example, if you have a dedicated testimonials page, you can set the amount on a per-page basis using the simple option.
There’s also an option to go a little more in-depth, using the standard WordPress method, see below for an example of this:
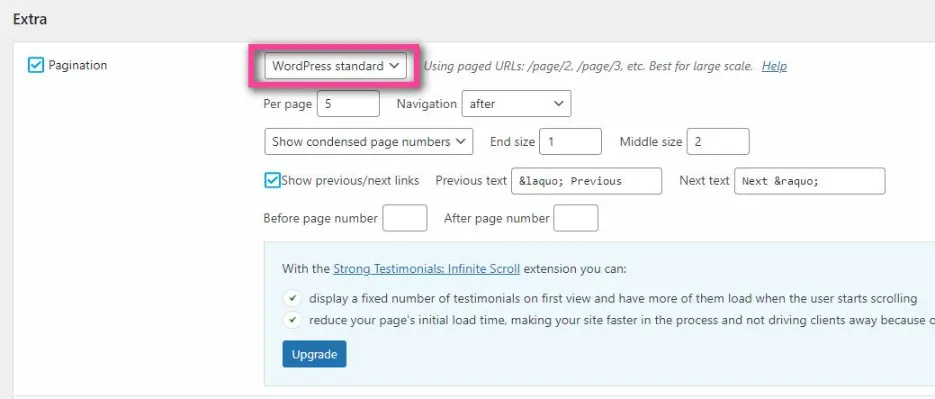
Using the standard way gives you more granular control, with the ability to show condensed page numbers, or show all at once.
You can also choose to show the page navigation before, after and before + after on your testimonials page.
You can also change the text for previous/next and more. Don’t need all of that? Choose the simple option!
The second option deals with read more settings:

It’s here you can select from the dropdown menu a specific page with all your testimonials, and some link text. The last part, allows you to display a link after all the testimonials, or on each one.
In turn, this means all testimonials, for this particular view, will link to the page of your choosing.
Style settings in views
Styles deal with the visuals of your testimonials. It’s all well and good having the content part, but we need to make them pop!
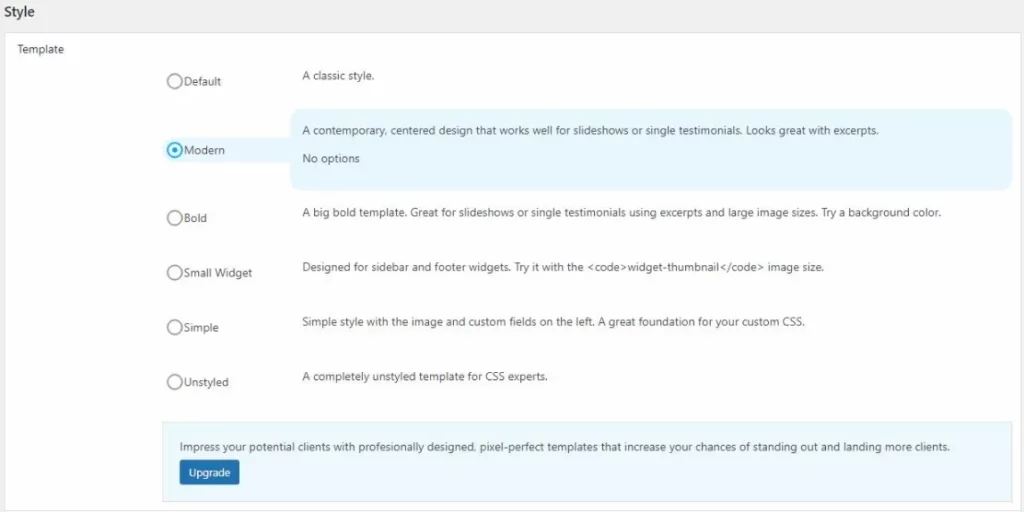
Strong Testimonials comes with six templates as standard. Default, Modern, Bold, Small Widget, Simple and Unstyled.
The default template has a couple of options available to you, see below:
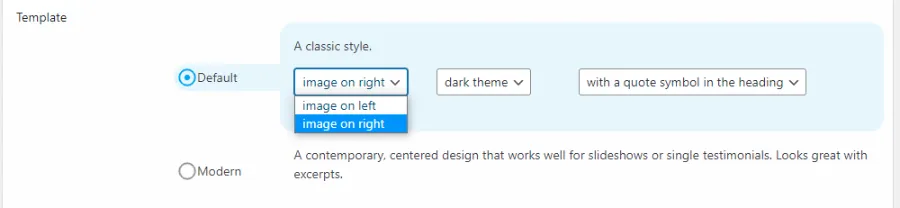
Here you can display the image on the left/right, choose from light/dark theme, and whether to display quote symbols, or not as the case may be.
The small widget template allows you to display an image on the left/right. The others do not have options associated with them.
The Unstyled template allows you (if you know CSS!) to create your own style, useful if you have a set style for your website.
Style layouts in views
There’s something for everyone in terms of layouts. You can choose from normal, Masonry, Columns or Grid.
If you’d like to preview what the layout will be, Strong Testimonials has an excellent feature for this, take a look at the below to see what I mean:
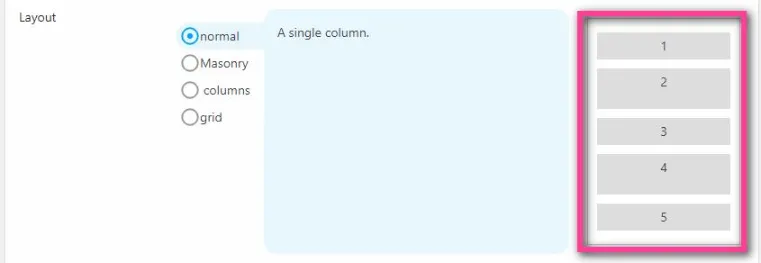
Normal will stack your testimonials one on top of the other. Useful if you have a single column layout under a call to action.

Pagination is not compatible with the Masonry layout, but as you can see from the above, you can change how many columns you’d like to display, along with an example of how it will look!
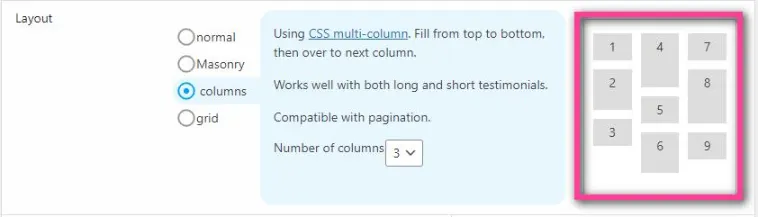
The columns’ layout will display testimonials from top to bottom. The example clearly demonstrates how this will be shown.

The grid layout will display your testimonials in equal sized boxes, which is handy if you’d like a uniformed approach to showcase your feedback.
Color settings in views
I like the way you can see a physical result of how your layout will look. Thankfully, this spills over into the color settings for Strong Testimonials.
In the example below, I’ve gone for a gradient background, and thanks to the ability to change the text color, I get a preview of how it will look:
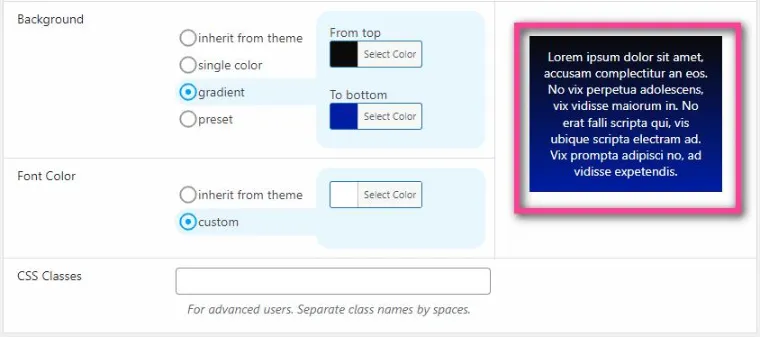
If you have an understanding of CSS, you can enter in your selectors just under the font color options. If you have styles that need to be adhered to, you can make changes via CSS code as you see fit.
What about a slideshow in views?
You may have noticed that the settings outlined above were for the Display method. So what about the slideshow settings? Don’t worry, I’ll go through them!
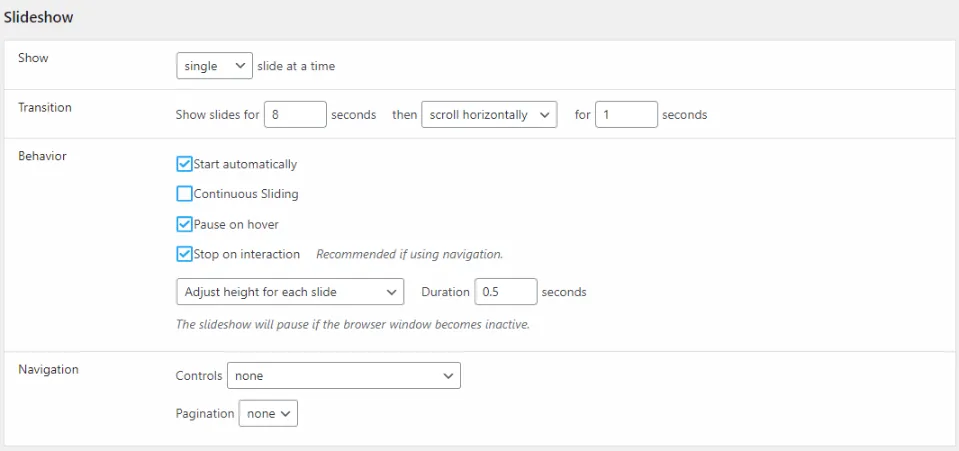
Show, here you can choose between single or multiple slides at a time. For now, I’m going to stick with single slides.
Transition, here you can enter in a numerical value for the display length of a given slide. The Then dropdown menu, lets you select from no transition effect, fade, scroll horizontally, or vertically.
Lastly, enter a time in seconds for the transition effect.
Transition, here you can enter in a numerical value for the display length of a given slide. The Then dropdown menu, lets you select from no transition effect, fade, scroll horizontally, or vertically. Lastly, enter a time in seconds for the transition effect.
Behavior, via checkboxes, you can enable/disable settings as you see fit. Start automatically, Continuous sliding, Pause on hover, or Stop on interaction.
Under this from the dropdown menu you can choose to Adjust the height for each slide and set a duration, or set the height to match the tallest slide. Doing this will show a checkbox to enable you to stretch the slides vertically.
Need to show more testimonials in your slideshow?
I was a little concerned with showing multiple slides in a slideshow, especially with responsive devices, such as mobile phones and tablets. I needn’t have been, a quick click on multiple, and you’ll see the below:
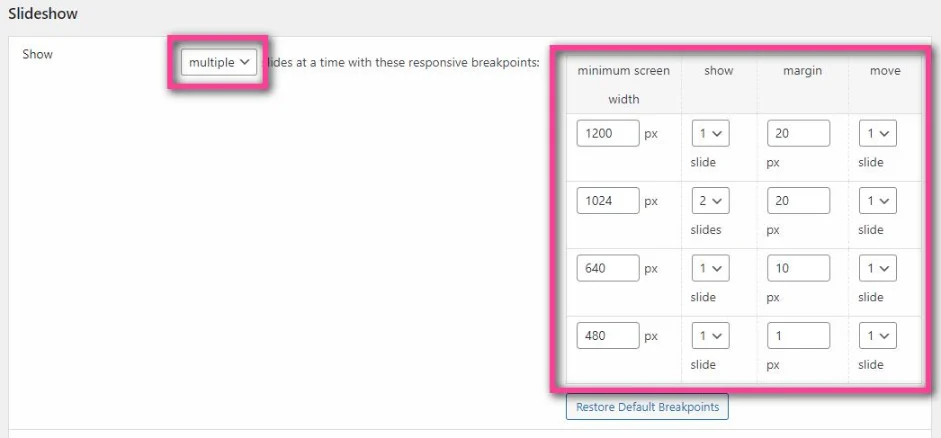
Here you can set a minimum screen width, and how many slides per slideshow you’d like to set at once. The width is in pixels, and clicking on the show box, you can choose between 1-4 slides per slideshow, set the margin in pixels, and the number of slides to move from again, between 1-4.
This is a killer feature, irrespective of screen size, you can be confident your testimonial slideshows will be on display for all to see!
Navigation for slideshow
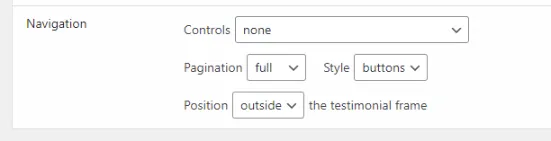
Navigation is important for visitors, and thankfully Strong Testimonials has you covered with settings.
Here you can choose the Controls method, options available are:
- Bottom: previous/play-pause/next
- Bottom: previous/next
- Slides: previous/next
Choosing any of the above methods, will open up a few more options, see below for an example:
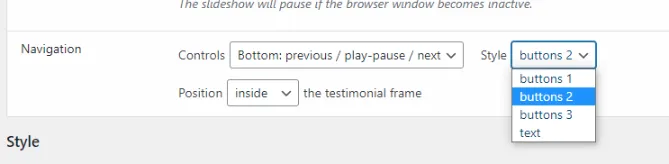
Select Buttons styles 1, 2, 3 or text. Position wise, you can choose from inside the testimonial frame or outside.
My only grumble so far?
With the previews we’ve already seen provided by Strong Testimonials, it would have been nice to see what the buttons look like. As it is, we’ll have to save all the settings, refresh the page/post they reside on to see a result. Not ideal.
That being said I still can’t believe this is all available in the free version. I have to say, the feature set so far is amazing.
Form views in Strong Testimonials
Strong Testimonials has a built-in form system for gathering testimonials, which is an excellent idea. Before I dip into forms and how they work, let’s take a look at the form views.
I’m used to the settings now, and everything is laid out in a way that’s very easy to understand.
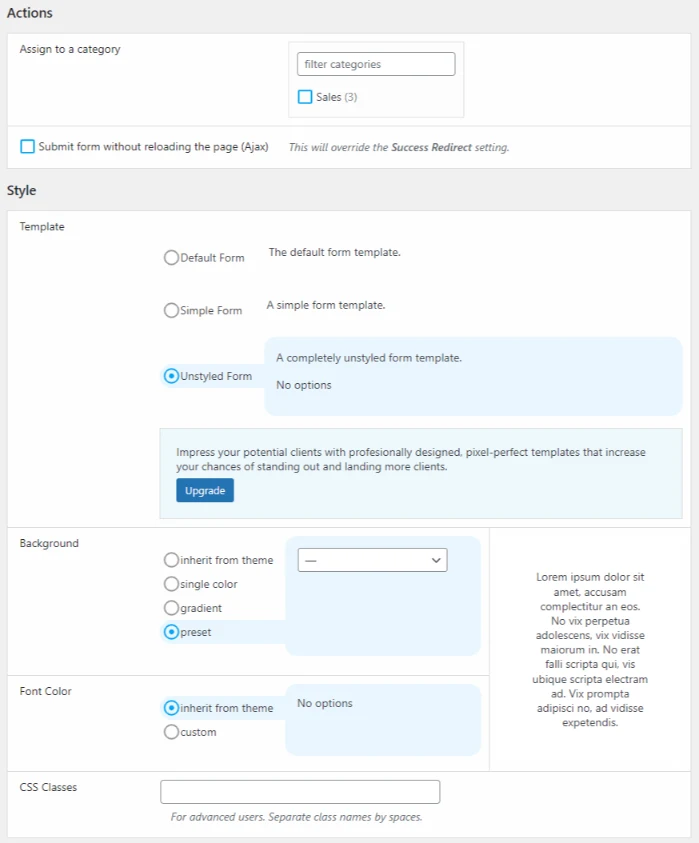
Actions, here you can choose a category to assign the form to. For example, let’s say you wanted to create a landing page to send to customers. But you want to collect testimonials for the sales team.
Attribute the form to the “sales” department and cut and paste the shortcode. Any submitted testimonials will be automatically attributed to sales! Super cool.
Just under this, you can elect to submit the form without reloading the page via Ajax. Note, that this will override the success redirect. More on that later!
Other settings deal with colors, font colors, backgrounds and templates. I’ve already covered this, so no point in going over old ground!
Single template view settings
Testimonials have their own custom post type. Using the Single template view, you can drag and drop/add fields to your liking. See below:
You can enable/disable and mess around with order if you so wish. There is limited functionality in the free version of Strong Testimonials when it comes to the Single template.
This isn’t a chink in its armor you understand, especially when so much functionality is free. But you will need to upgrade to Advanced views to get the most out of it.
Thoughts so far?
I’m mighty impressed, for a free plugin, I can see why Strong Testimonials has the installation count it does. It’s pretty slick, I’ve not even had to read any documentation to get it working. Which, in my book, is always a very good sign.
We’re not done yet, there’s more!
Form settings
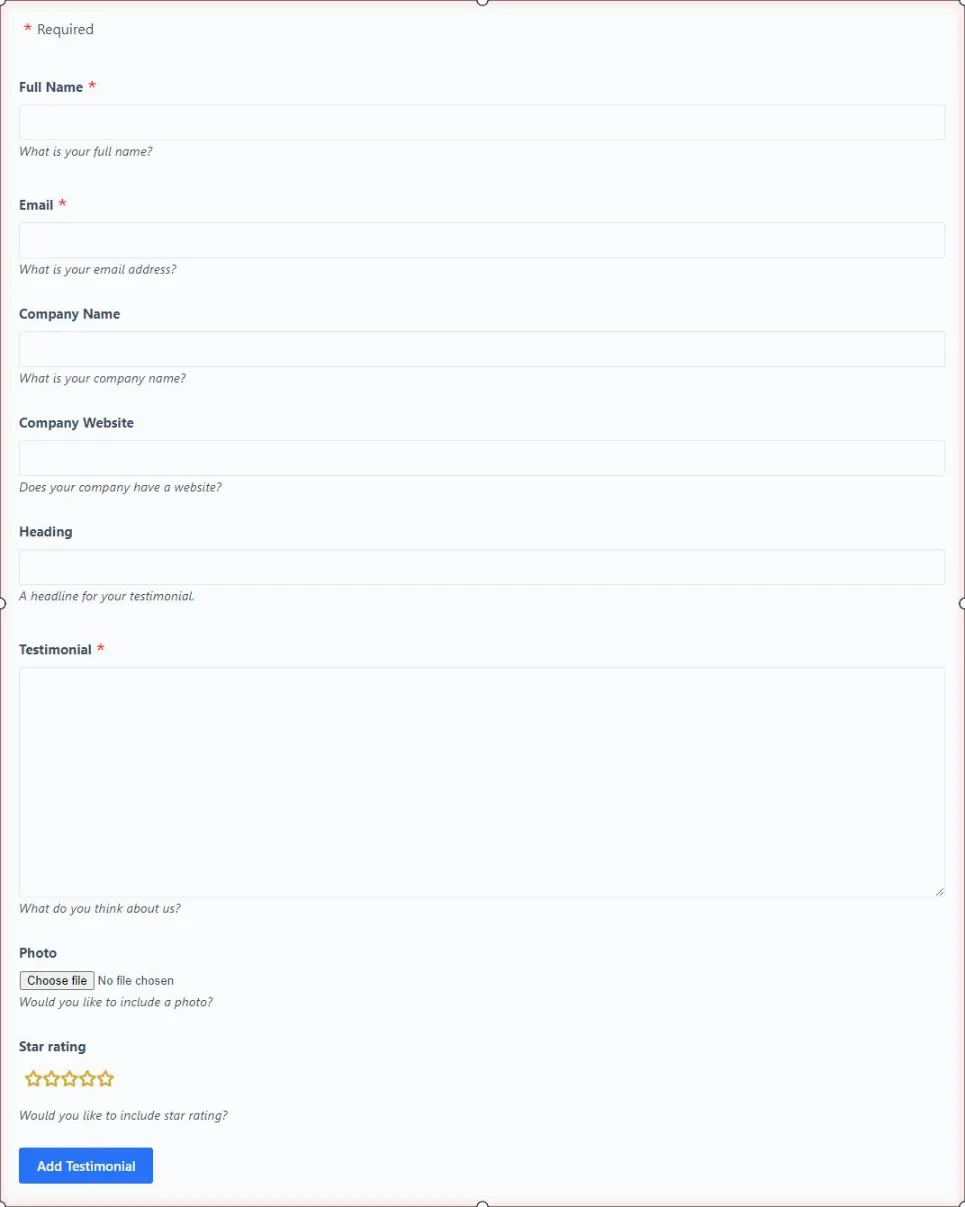
Wouldn’t it be nice if you could request a testimonial via a form? Well, Strong Testimonials has a form solution built-in, to help you get those all important website testimonials.
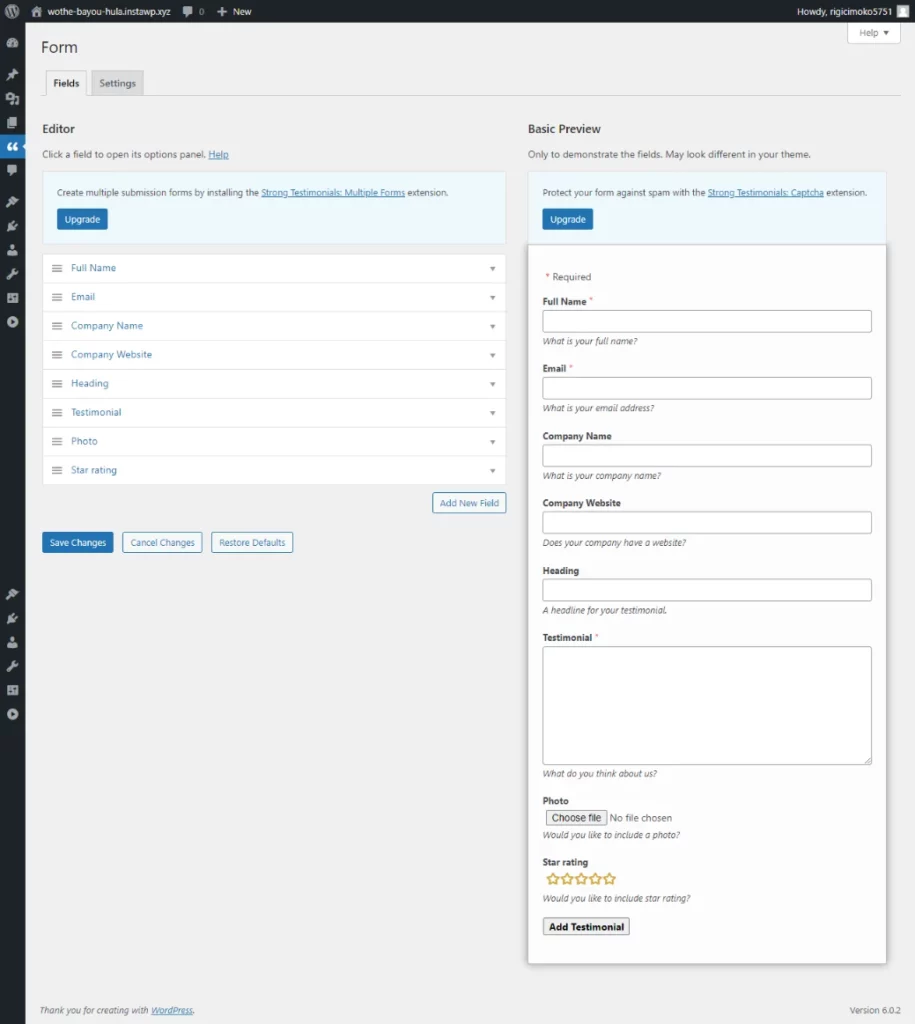
Drag and drop time! Here you can reorder the information for your testimonial form. Plus, if you’d like to add more fields, you can do so. What I like, and I think you’ll probably like is its simplicity.
A lot of form generators can be overly complex, not all, but some. That’s not the case here, and couple this with a preview of what the form will look like is gold dust.
If you’re asking a customer for a testimonial, it doesn’t have to be complicated, in truth? They’ll probably wind up getting bored, or worse yet, never fill it in.
Settings for forms
Now, this is pretty sweet. I’ll break the page down into sections for you, it’s just easier that way. First up, let’s take a look at form labels and messages.
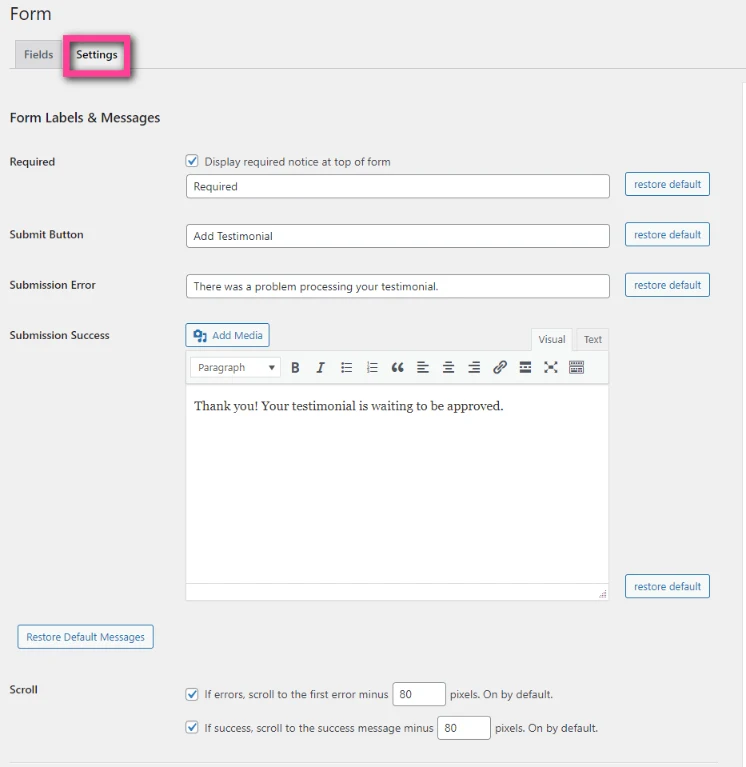
As you can see from the above, the first section is a very straight-forward affair. Information you provide here, will be shown after the customer has submitted their testimonial.
Change the text on the button, provide a custom success message, and more. I’ve not tampered with the scroll settings for errors and success, the plugin states it’s 80 pixels by default, and I’ll assume they know what they’re doing!
Form actions
Now, this is where it gets interesting:
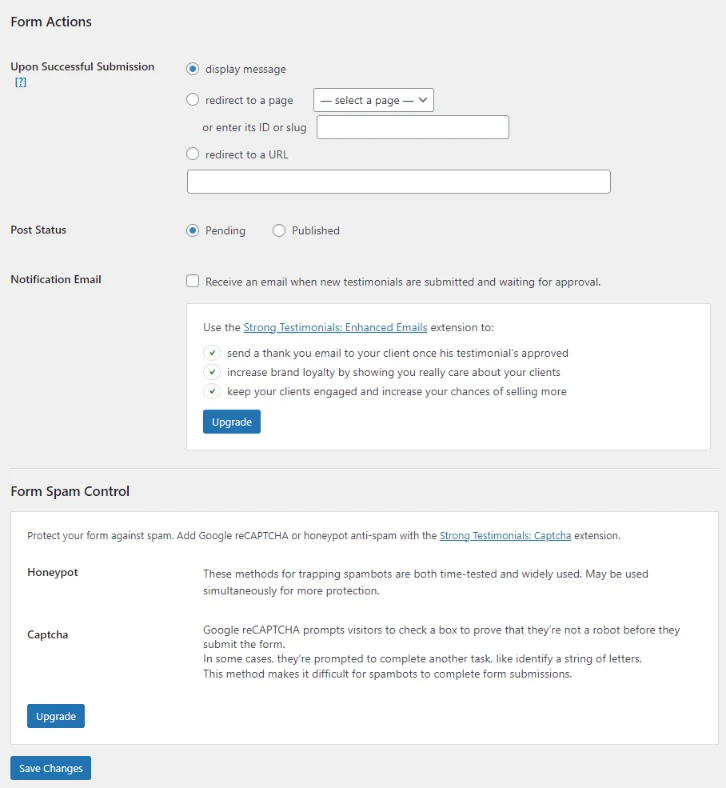
Again, really simple to understand, and I’m loving the flow of this. Upon successful submission, you can choose what you’d like to do. Either display text (from the text editor mentioned previously) or, if you want to, you can redirect them to a URL or a page/post.
Using the redirect to a page/post function, you can decide, from a dropdown menu, a specific page you’d like them to land on.
Just had an idea (hear me out)
Now, this is cool. Imagine you run an eCommerce store using WooCommerce or something. Why not take advantage of your redirect, by creating a “Thank You” page, with a special offer!
How cool would that be? The customer fills in the testimonial, and boom, they’re redirected to a limited time offer on a product of your choosing. It’s a win for them, and a win for you.
Submitted testimonials
Collecting data, and displaying it on a website can, well, it can be a massive pain in the rear. It’s worth noting here that Strong Testimonials attributes the form data and saves it ready as its custom post type.
All you have to do is decide to automatically publish it, or save it as pending. My opinion? I’d always save them as pending, just in case you get one that’s awful!
We want to get notified of new testimonials when they’re submitted, a quick click of the checkbox for Notification Email, and you’re done.
If you want to do more with emails, there are a couple of extensions, such as enhanced emails, and a Captcha extension to eliminate spam. Both of these are upgrades.
Again, it’s one of those things, if you can cope without the above pro extensions, Strong Testimonials is rock solid so far, and would be good to go for any business seeking to increase their testimonials!
Shortcodes
I often get stuck with shortcodes, having to refer to documentation to remember what does what, refreshingly Strong Testimonials doesn’t suffer from lack of information on them.
In the admin sidebar, there’s a handy link that covers all the available shortcodes, and what they do:
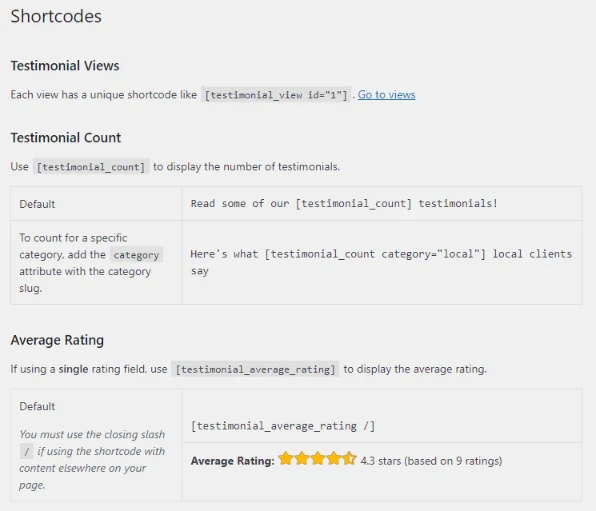
The above is just a snapshot, trust me when I say there are a lot more shortcodes on offer, and nothing is spared!
Testimonial settings
I’ll have to show you this in sections as well. First let’s take a quick overview of the Admin settings, take a look at the below:
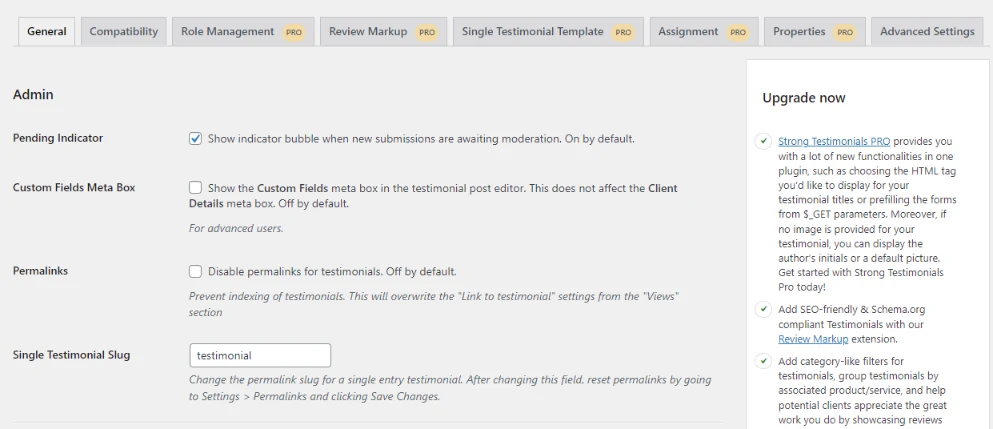
Here, you can disable/enable the icon for new testimonial submissions, whilst they’re pending moderation. Enable/disable the custom fields meta box in the single template.
Permalinks is an interesting one. Here you can disable them completely. This means that there will be no single template used for testimonials.
This is actually a great feature, if you don’t like the idea of having a single post template for testimonials, and simply want to display the contents of them in other posts/pages, you can.
Just under this, is the testimonial slug, enter some text here and change it to whatever you need.
*Important tip! Remember to resave your permalinks for the changes to take effect.
Output settings
Again, all self-explanatory here. Enable touch swipe navigation for slideshows, scroll to top (adjust the container in pixels), and remove whitespace.
There’s even a setting to allow comments on testimonials, although you’ll need to have the single post template for testimonials active.
Embed width is an interesting one, especially if you’ve embedded a video inside a testimonial. Here, you can set the frame width in pixels. The last few options deal with links and enabling/disabling the nofollow, noopener and settings in individual testimonials.
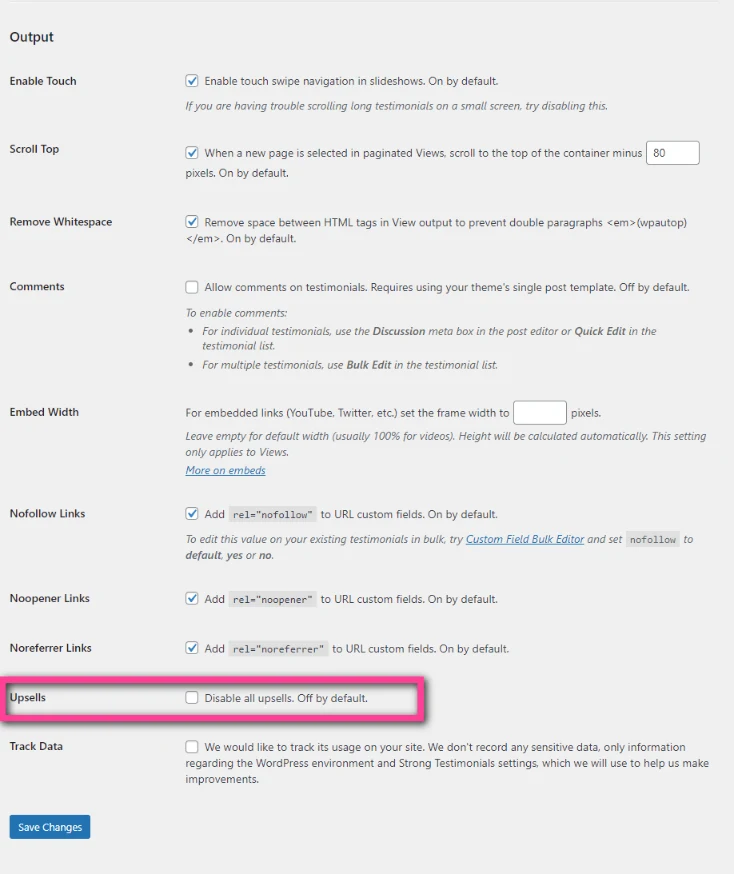
Upsells. You’ll notice that I’ve purposefully highlighted this with the pink box. Throughout this review so far, you’ll have no doubt seen various upsells clipped from the screenshots I’ve taken.
This wasn’t me being awkward, you understand, I wanted to see if they were invasive as part of the review process. Many plugin developers push upgrades all the time, after all it’s a revenue generator for them. Rightly so.
Thankfully via a click of a button you can remove all upsells from everywhere. I’ve tested this, and it works as it should.
Testimonial settings compatibility
I can see why this has been done. If I was the owner of this plugin, I’d do exactly the same. Not that there are any compatibility issues you understand, but having this section, will no doubt help eliminate support questions!
Especially when you consider there are over 100k in active installations of Strong Testimonials. I won’t post a screenshot of the top section, it’s just a list of common scenarios and how to rectify them.
Below is a snapshot of the compatibility settings you can change:
Here you can randomize your testimonials via JavaScript, and as it states, this is for use when using a WordPress cache plugin.
I’ve purposefully clicked on the Advanced radio button under Ajax Page Loading, so you can see all the available options.
I’m no expert on prerendering or monitoring, and I’d be lying if I said I was. So a screenshot showing it, should help you more than me writing nonsense!
Examples of Testimonials
I’ve cobbled together some examples of what testimonials look like on the front end, you’ll have to excuse my wording and images. At the very least they should showcase what is possible if you decide to use Strong Testimonials.

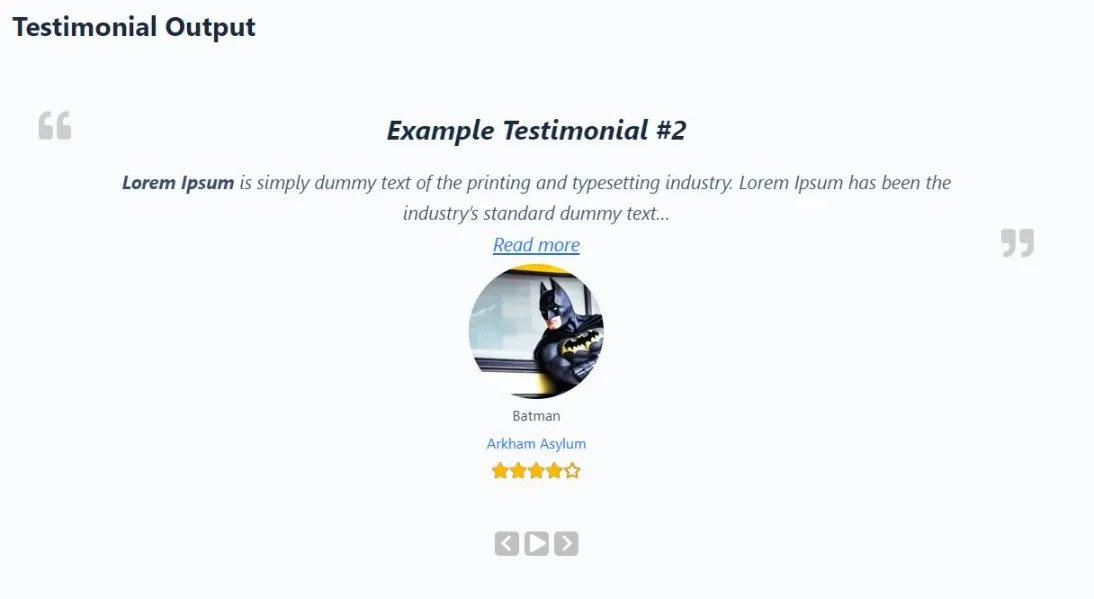
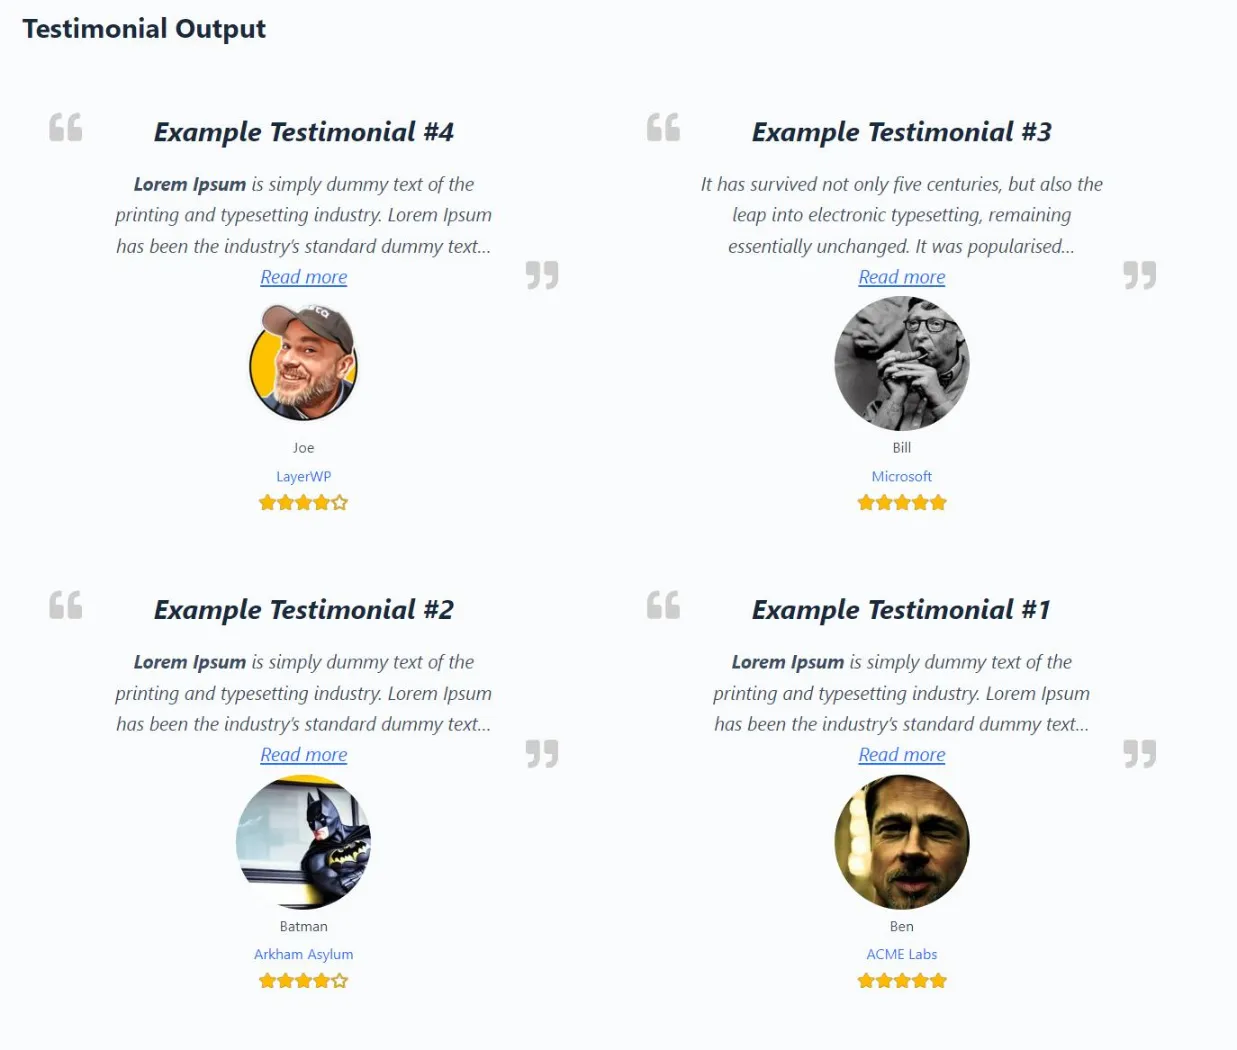
I’ve cobbled together some examples of what testimonials look like on the front end, you’ll have to excuse my wording and images. At the very least they should showcase what is possible if you decide to use Strong Testimonials.
Playing around with options, color backgrounds, gradients and layouts, there’s something for everyone. Hey, if you’re accustomed to CSS, you can go crazy!
Review verdict on the free version of Strong Testimonials
The free version is packed full of features, and for a freemium solution, I’m actually quite astounded as to what is available in the base version. I’ve seen a lot of plugins over my time with WordPress and I mean a lot.
One thing that has stood out to me, is that while freemium plugins are all well and good and help push the premium version, some plugins (and I mean some) hide essential functionality until you upgrade.
I don’t see that with Strong Testimonials, and I’m probably doing a disservice to the product owner, but you won’t be caught short with this plugin. It’s perfectly suitable as it is.
If you’re looking for a testimonial plugin, with plenty of functionality, and free to use, I’d have no qualms about recommending Strong Testimonials, it’s a great solution.
If you’d like to find out more about the free version of Strong Testimonials, check them out on WordPress.org here.
Subscribe To My Newsletter
Read it? Share it!
Leave a Reply